Zendesk Outbound
- 15 May 2023
- 3 Minutes to read
- Print
- DarkLight
- PDF
Zendesk Outbound
- Updated on 15 May 2023
- 3 Minutes to read
- Print
- DarkLight
- PDF
Article summary
Did you find this summary helpful?
Thank you for your feedback!
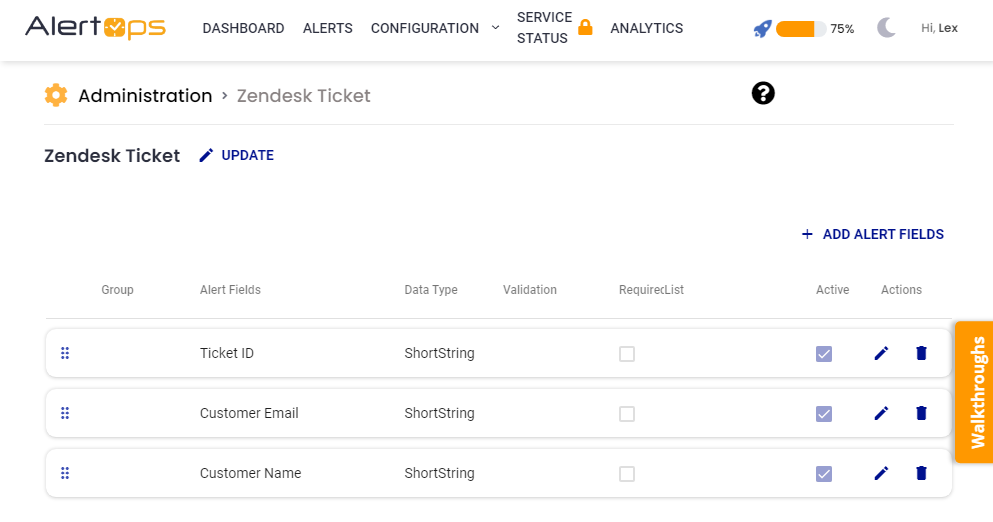
Create an Alert Template
- From the main menu, click Configuration and select Administration from the submenu.
- From the Custom Alert Fields section, click the Add Alert Type button on the right.
- Name the template 'Zendesk Ticket' and submit it to save.
- Click the 'Add Alert Fields' button on the right.
- Add the following Attributes:
- Name: Customer Name
- Data Type: short string
- Active: true
- Create another Alert Field with the following attributes:
- Name: Customer Email
- Data Type: short string
- Active: true
- Create another Alert Field with the following attributes:
- Name: Ticket ID
- Data Type: short string
- Active: true
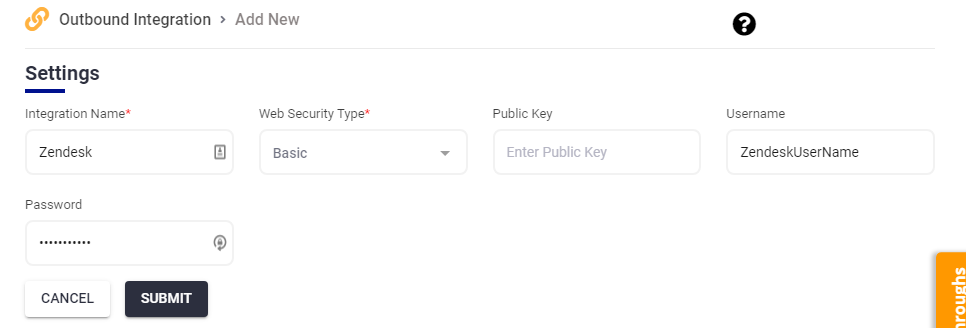
Create the Outbound Integration
- From the main menu, click Configuration and select Integrations from the submenu.
- Scroll down to Outbound Integrations and click the Add Outbound Button on the right.
- Enter the Service Name “Zendesk”.
- For Web Security Type select Basic.
- Input Zendesk Username (user must have permission to create and modify tickets)
- Input Zendesk user password.
Create Methods
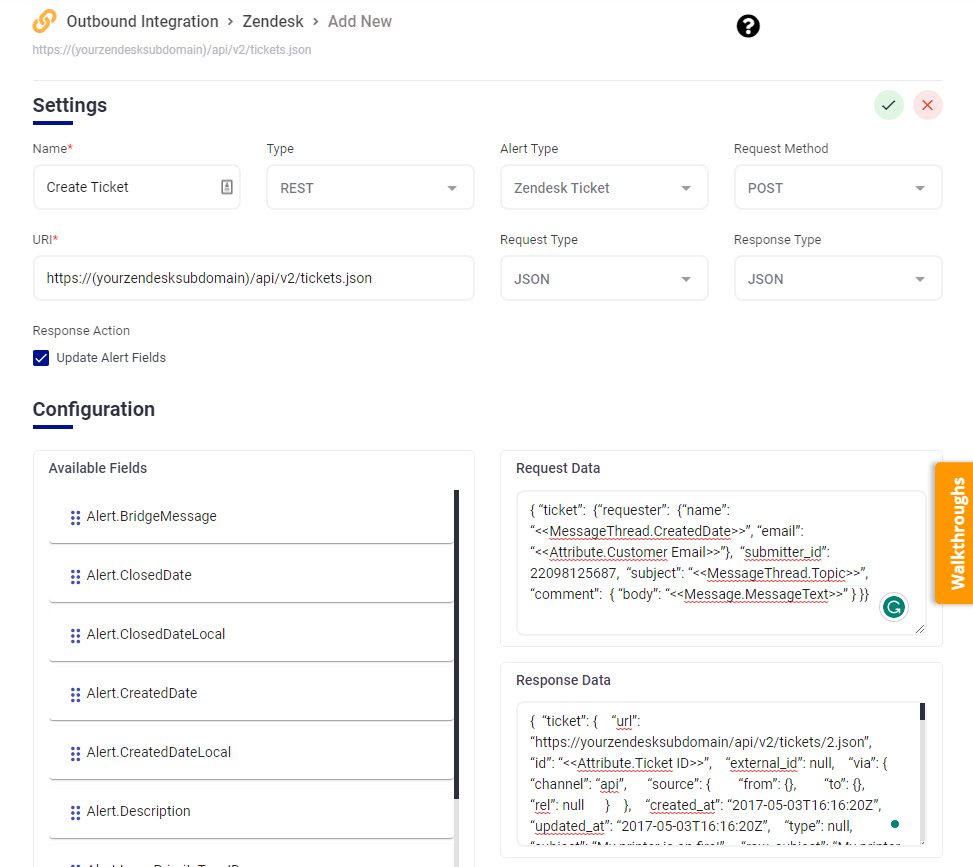
Create Ticket Method
From the Service Detail screen, click Add Method.
Method Name: Create Ticket
Service Type: REST
Template Type: Zendesk Ticket
URI: https://(yourzendesksubdomain)/api/v2/tickets.json
Content Type: JSON
Web Method: POST
Response Data Type: JSON
Response Action: Update Alert Fields = true
Request Data:
{ “ticket”: {“requester”: {“name”: “<<MessageThread.CreatedDate>>”, “email”: “<<Attribute.Customer Email>>”}, “submitter_id”: 22098125687, “subject”: “<<MessageThread.Topic>>”, “comment”: { “body”: “<<Message.MessageText>>” } }}Response Data:
{ “ticket”: { “url”: “https://yourzendesksubdomain/api/v2/tickets/2.json”, “id”: “<<Attribute.Ticket ID>>”, “external_id”: null, “via”: { “channel”: “api”, “source”: { “from”: {}, “to”: {}, “rel”: null } }, “created_at”: “2017-05-03T16:16:20Z”, “updated_at”: “2017-05-03T16:16:20Z”, “type”: null, “subject”: “My printer is on fire!”, “raw_subject”: “My printer is on fire!”, “description”: “The smoke is very colorful.”, “priority”: null, “status”: “open”, “recipient”: null, “requester_id”: 22104712247, “submitter_id”: 22098125687, “assignee_id”: 22098125687, “organization_id”: null, “group_id”: 41944047, “collaborator_ids”: [], “forum_topic_id”: null, “problem_id”: null, “has_incidents”: false, “is_public”: true, “due_at”: null, “tags”: [], “custom_fields”: [], “satisfaction_rating”: null, “sharing_agreement_ids”: [], “fields”: [], “brand_id”: 7285807, “allow_channelback”: false }, “audit”: { “id”: 296605396767, “ticket_id”: 2, “created_at”: “2017-05-03T16:16:20Z”, “author_id”: 22098125687, “via”: { “channel”: “api”, “source”: { “from”: {}, “to”: {}, “rel”: null } }, “metadata”: { “system”: { “client”: “Mozilla/5.0 (Windows NT 6.1; WOW64) AppleWebKit/537.36 (KHTML, like Gecko) Chrome/57.0.2987.133 Safari/537.36”, “ip_address”: “173.167.172.193”, “location”: “Schaumburg, IL, United States”, “latitude”: 42.04079999999999, “longitude”: -88.1084 }, “custom”: {}, “notifications_suppressed_for”: [ 22104712247 ] }, “events”: [ { “id”: 296605396847, “type”: “Comment”, “author_id”: 22098125687, “body”: “The smoke is very colorful.”, “html_body”: “<div class=\”zd-comment\”><p dir=\”auto\”>The smoke is very colorful.</p></div>”, “plain_body”: “The smoke is very colorful.”, “public”: true, “attachments”: [], “audit_id”: 296605396767 }, { “id”: 296605397367, “type”: “Create”, “value”: “22104712247”, “field_name”: “requester_id” }, { “id”: 296605397407, “type”: “Create”, “value”: “My printer is on fire!”, “field_name”: “subject” }, { “id”: 296605397447, “type”: “Create”, “value”: “open”, “field_name”: “status” }, { “id”: 296605397487, “type”: “Create”, “value”: null, “field_name”: “priority” }, { “id”: 296605397527, “type”: “Create”, “value”: null, “field_name”: “type” }, { “id”: 296605397547, “type”: “Create”, “value”: “22098125687”, “field_name”: “assignee_id” }, { “id”: 296605397587, “type”: “Create”, “value”: “41944047”, “field_name”: “group_id” }, { “id”: 296605397627, “type”: “Notification”, “via”: { “channel”: “rule”, “source”: { “to”: {}, “from”: { “id”: 309061307, “title”: “Notify all agents of received request” }, “rel”: “trigger” } }, “subject”: “[{{ticket.account}}] {{ticket.title}}”, “body”: “A ticket (#{{ticket.id}}) by {{ticket.requester.name}} has been received. It is unassigned.\n\n{{ticket.comments_formatted}}”, “recipients”: [ 22098125687 ] } ] }}
Close Ticket Method
From the Service Detail screen click Add Method.
Method Name: Close Ticket
Service Type: REST
Template Type: Zendesk Ticket
URI: https://(yourzendesksubdomain)/api/v2/tickets.json
Content Type: JSON
Web Method: PUT
Response Data Type: JSON
Response Action: Update Alert Fields = false
Request Data:
<pre>


{“ticket”: {“status”: “closed”, “comment”: { “body”: “<<MessageThread.Resolution>>”, “author_id”: 22098125687}}}


</pre>
Add Comment Method
From the Service Detail screen click Add Method.
Method Name: Add Comment
Service Type: REST
Template Type: Zendesk Ticket
URI: https://(your zendesk subdomain)/api/v2/tickets/<<Attribute.Ticket ID>>.json
Content Type: JSON
Web Method: PUT
Response Data Type: JSON
Response Action: Update Alert Fields = false
Request data:
<<Attribute.Ticket ID>><<MessageThread.BridgeMessage>><<MessageThread.Description>>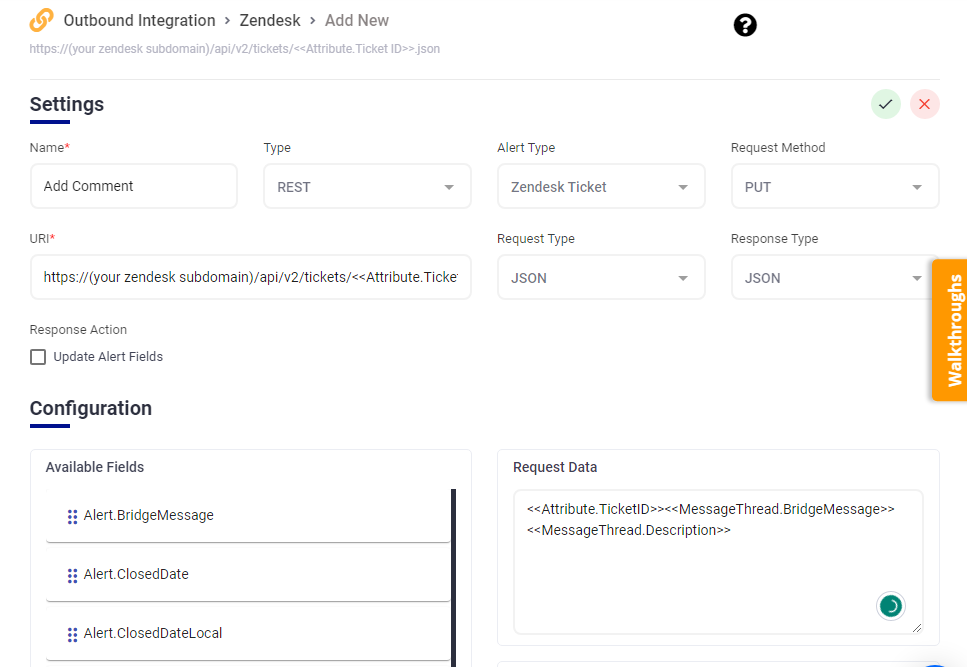
Create Workflows
- Navigate to Configuration and select Workflows from the submenu.
- Click the Add Workflow button on the right
- Create the following workflows:
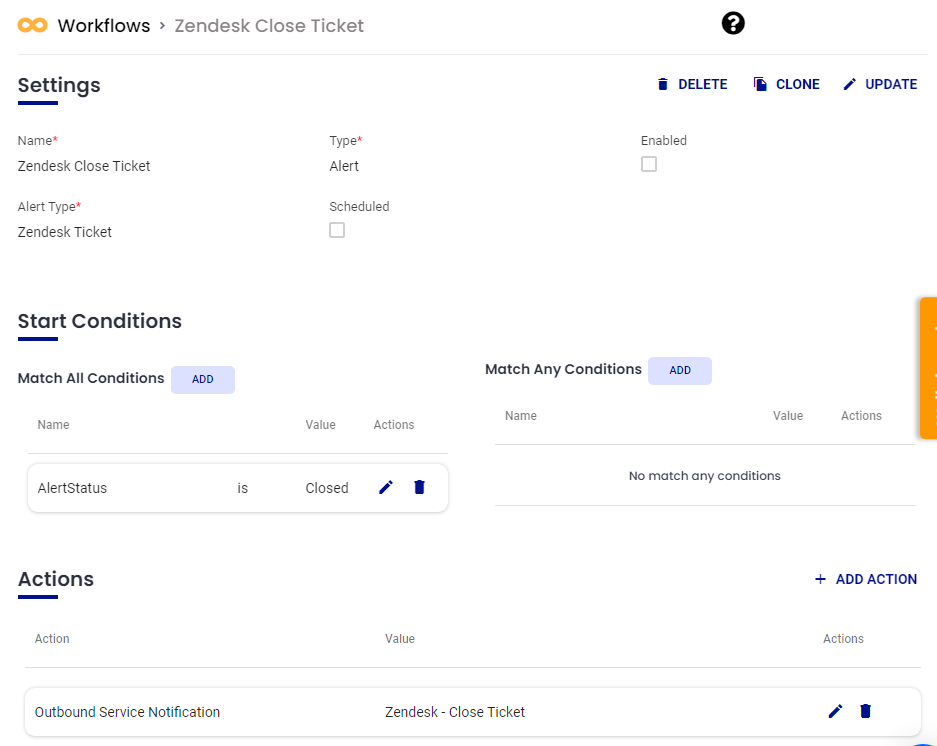
Close Ticket Workflow
Type: Alert
Name: Zendesk Close Ticket
Alert Type: Zendesk Ticket
Scheduled: false
Start Conditions:
AlertStatus is Closed
Actions:
Action: Outbound Service Notification
Web Method: Zendesk – Close Ticket
Add Assignment Comment Workflow
Type: Alert
Name: Zendesk Add Assignment
Alert Type: Zendesk Ticket
Scheduled: false
Start Conditions:
AlertStatus is Assigned
Actions:
Action: Outbound Service Notification
Web Method: Zendesk – Add Comment
Message Text: {“ticket”: {“comment”: { “body”: “Ticket has been assigned to <<MessageThread.OwnerName>>”, “author_id”: 22098125687}}}
.png)
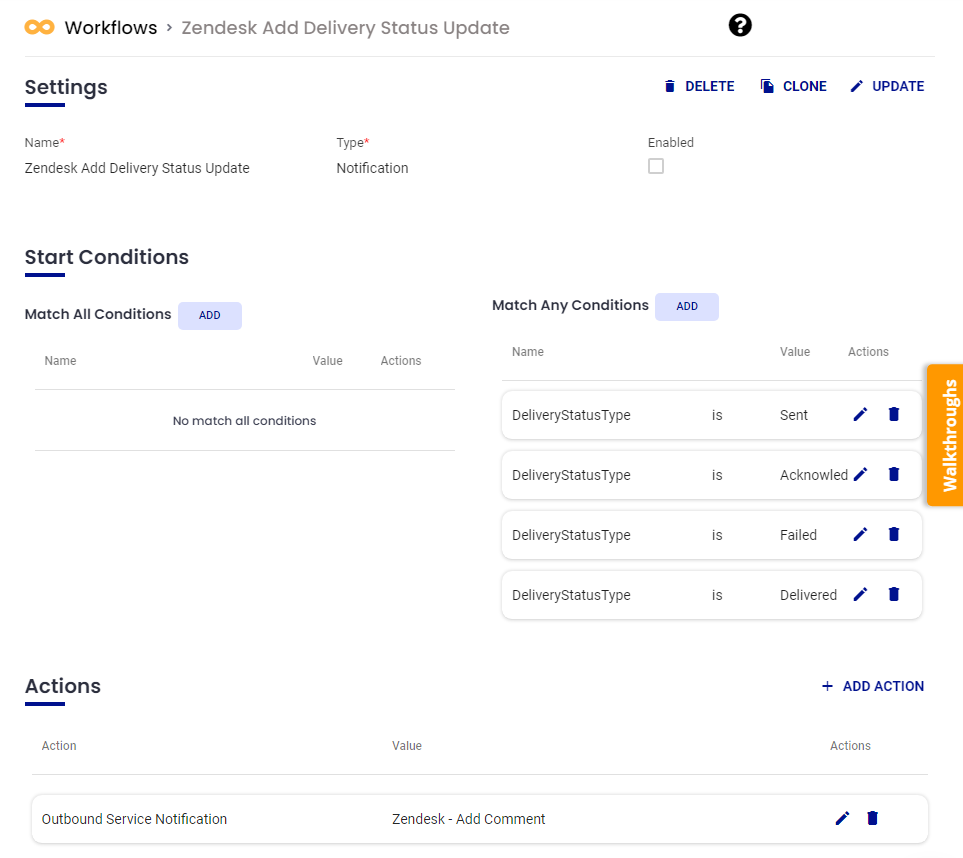
Add Delivery Status Update Workflow
Type: Notification
Name: ZenDesk Add Delivery Status Update
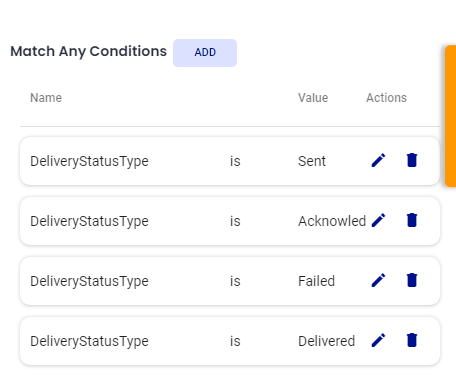
Start Conditions
Under Match Any, input the following Start Conditions:
DeliveryStatusType is sent OR
DeliveryStatusType is acknowledged OR
DeliveryStatusType is failed OR
DeliveryStatusType is delivered
Actions
Action: Outbound Service Notification
Outbound Action: Zendesk – Add Comment
Message Text: {“ticket”: {“comment”: { “body”: “Delivery Status <<DeliveryAttempt.Status>> for user <<DeliveryAttempt.ContactName>> device <<DeliveryAttempt.ContactType>>.”, “author_id”: 22098125687}}}
Important Note:
Ensure all workflows are enabled before moving on to the next step.
Create the Zendesk Escalation Policy
- Navigate to Configuration and select Escalation Policies from the submenu.
- Click the Add Escalation Policy button on the right
- Input the following Configurations:
- Name: Zendesk Alert
- Description: Zendesk Alert
- Priority: Critical
- Enabled: true
- Quick Launch: false
- From the Automation Tab, click the Add Workflow button.
- Check the box next to the workflows we just created and click the right arrow to move them into Selected Workflows. Then click submit to save them to this escalation policy.
Was this article helpful?