Webmon
- 09 Dec 2021
- 4 Minutes to read
- Print
- DarkLight
- PDF
Webmon
- Updated on 09 Dec 2021
- 4 Minutes to read
- Print
- DarkLight
- PDF
Article summary
Did you find this summary helpful?
Thank you for your feedback!
Webmon
Webmon Integration Guide
Webmon is a simple and convenient tool to monitor the uptime of your website and other infrastructure. Integrate AlertOps’ alert management platform with Webmon to receive and respond to critical alerts through email, SMS, push notification, and phone alerts. AlertOps ensures that alerts received from Webmon always reach the correct, available team member by utilizing escalation policies and on-call schedules.
AlertOps Configuration
- From the main menu, click on Integrations and then select Inbound Integrations from the sub menu.
- Select API tab
- Select the 'ADD API INTEGRATION' button, you should now be on the API Integration Detail page.
- Select Webmon from the pre-built Integration Templates.
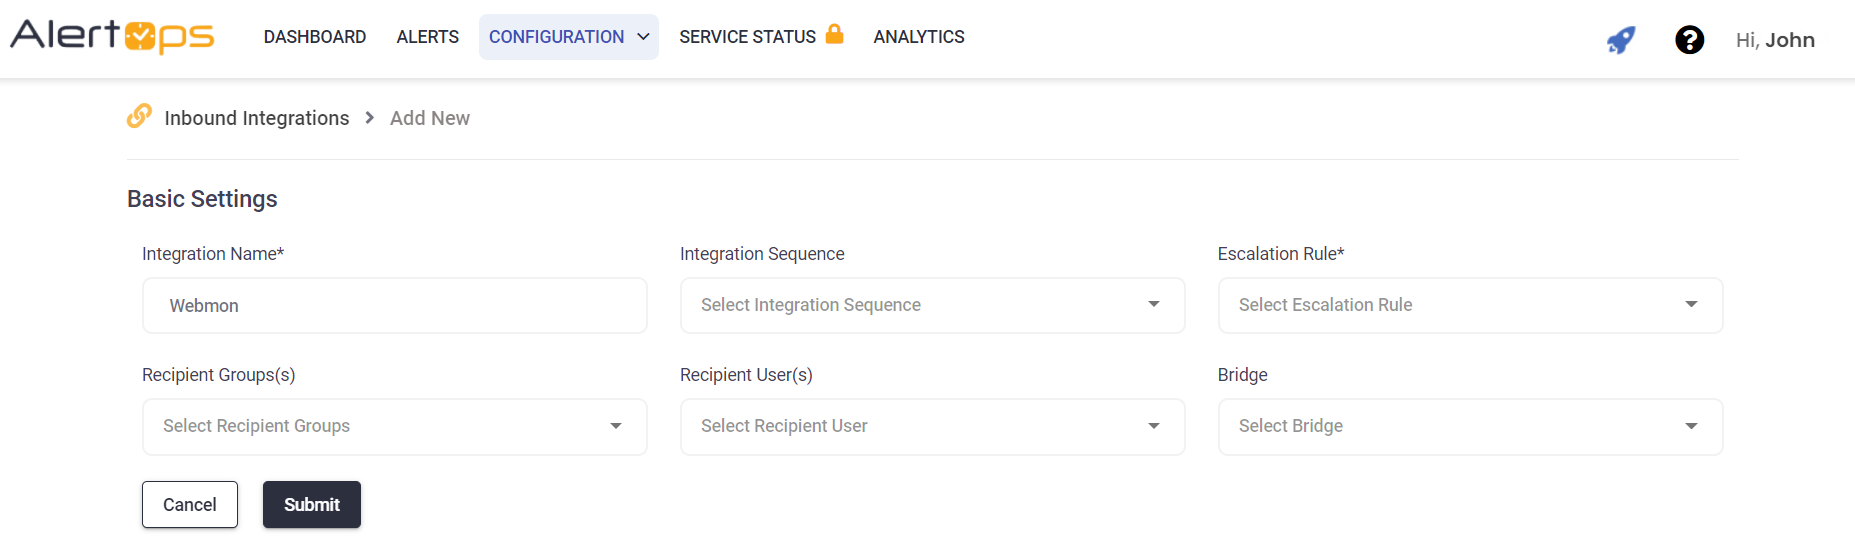
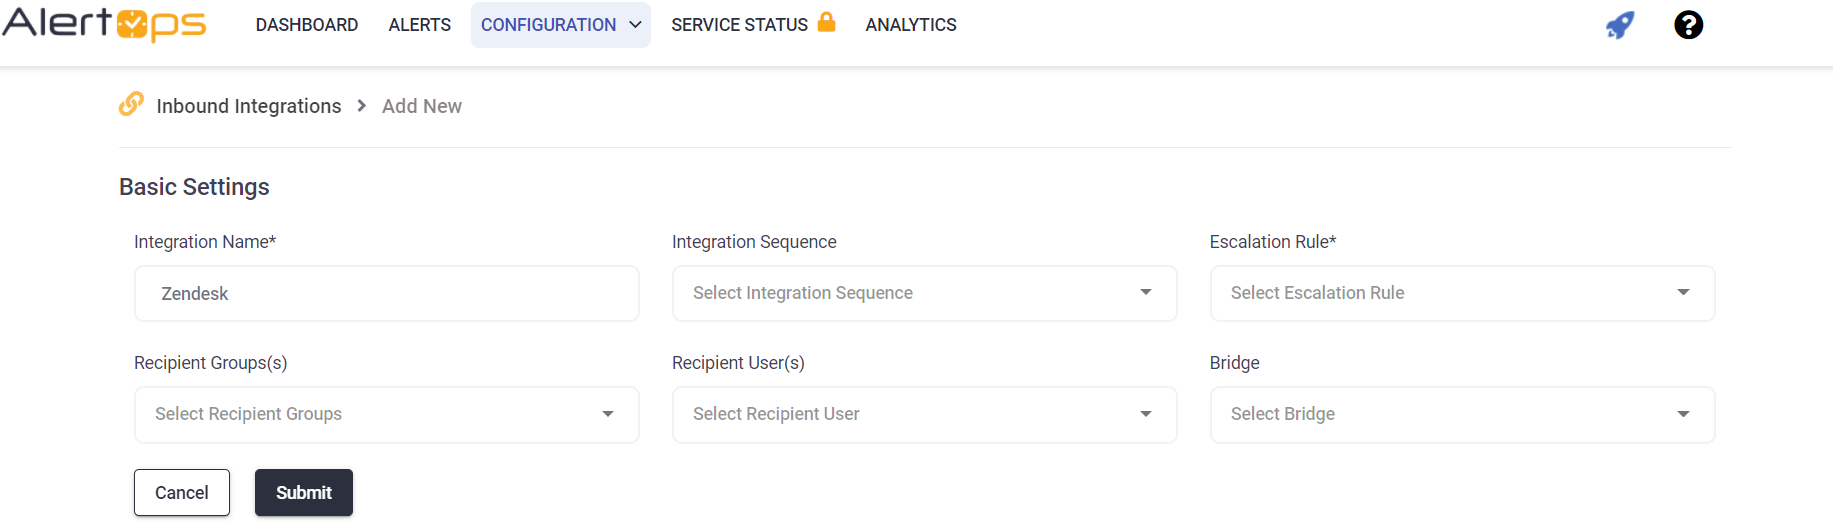
- Enter a name for the integration.
- Select an escalation rule to determine the integration's escalation policy.
- Enter the names of recipient group(s) and recipient user(s).
- Click 'SAVE.' Then, click 'COPY URL' to copy the URL endpoint to be used in the Webmon configuration.
Webmon Configuration
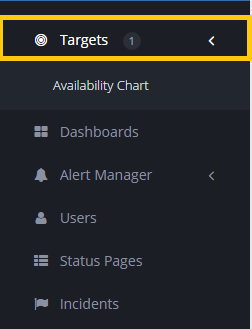
Step 1: From the left side navigation bar, select Targets.
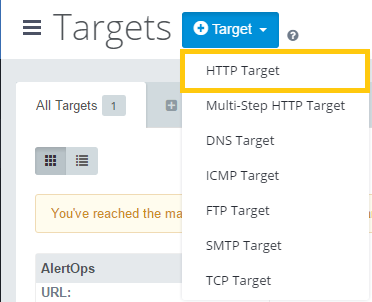
Step 2: Add a new target and choose the HTTP target option.
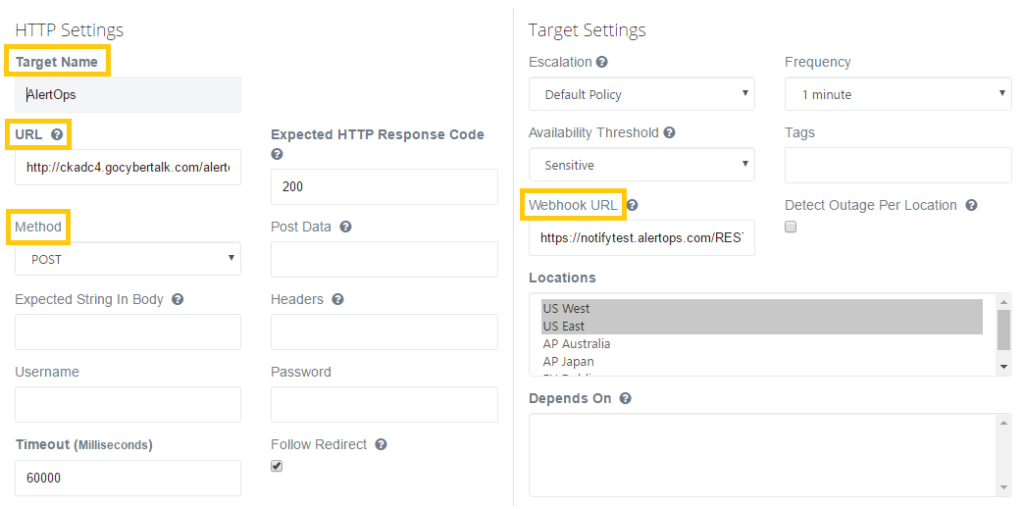
Step 3: Complete the required fields.
Step 4: Test the settings and save.
Alert Triggering Information
AlertOps will automatically create an incident when a new alert is received from Webmon with an IncidentStatus status of “error.”
If an alert with status “error” matches an existing Open Alert, AlertOps will recognize the new alert as a duplicate and ignore the alert. The alert will be recorded in the Inbound Messages table as “Mapped Appended.”
AlertOps will automatically close the same incident when an alert with an IncidentStatus status “reachable” is received.
Testing and Troubleshooting
Click here to read about Web API Testing and Troubleshooting.
Zendesk
Zendesk Integration Guide
Zendesk delivers cloud-based customer service software with a support ticketing system and self-service platform. Integrate AlertOps’ alert management platform with Zendesk to receive and respond to critical alerts through email, SMS, push notification, and phone alerts. AlertOps ensures that alerts received from Zendesk always reach the correct, available team member by utilizing escalation policies and on-call schedules.
AlertOps Configuration
From the main menu, click on Integrations and then select Inbound Integrations from the sub menu.
- Select API tab
- Select the 'ADD API INTEGRATION' button, you should now be on the API Integration Detail page.
- Select Zendesk from the pre-built Integration Templates.
- Enter a name for the integration.
- Select an escalation rule to determine the integration's escalation policy.
- Enter the names of recipient group(s) and recipient user(s).
- Click 'SAVE.' Then, click 'COPY URL' to copy the URL endpoint to be used in the Zendesk configuration.
Zendesk Configuration
Step 1: Refer to Zendesk Documentation Click here to go to Zendesk documentation.
Alert Triggering Information
AlertOps will automatically create an incident when a new alert is received from Zendesk with an IncidentStatus status of “open.”
If an alert with status “open” matches an existing Open Alert, AlertOps will recognize the new alert as a duplicate and ignore the alert. The alert will be recorded in the Inbound Messages table as “Mapped Appended.”
AlertOps will automatically close the same incident when an alert with an IncidentStatus status “closed” is received.
Testing and Troubleshooting
Click here to read about Web API Testing and Troubleshooting.
Zendesk Outbound
Create a Zendesk Alert Template
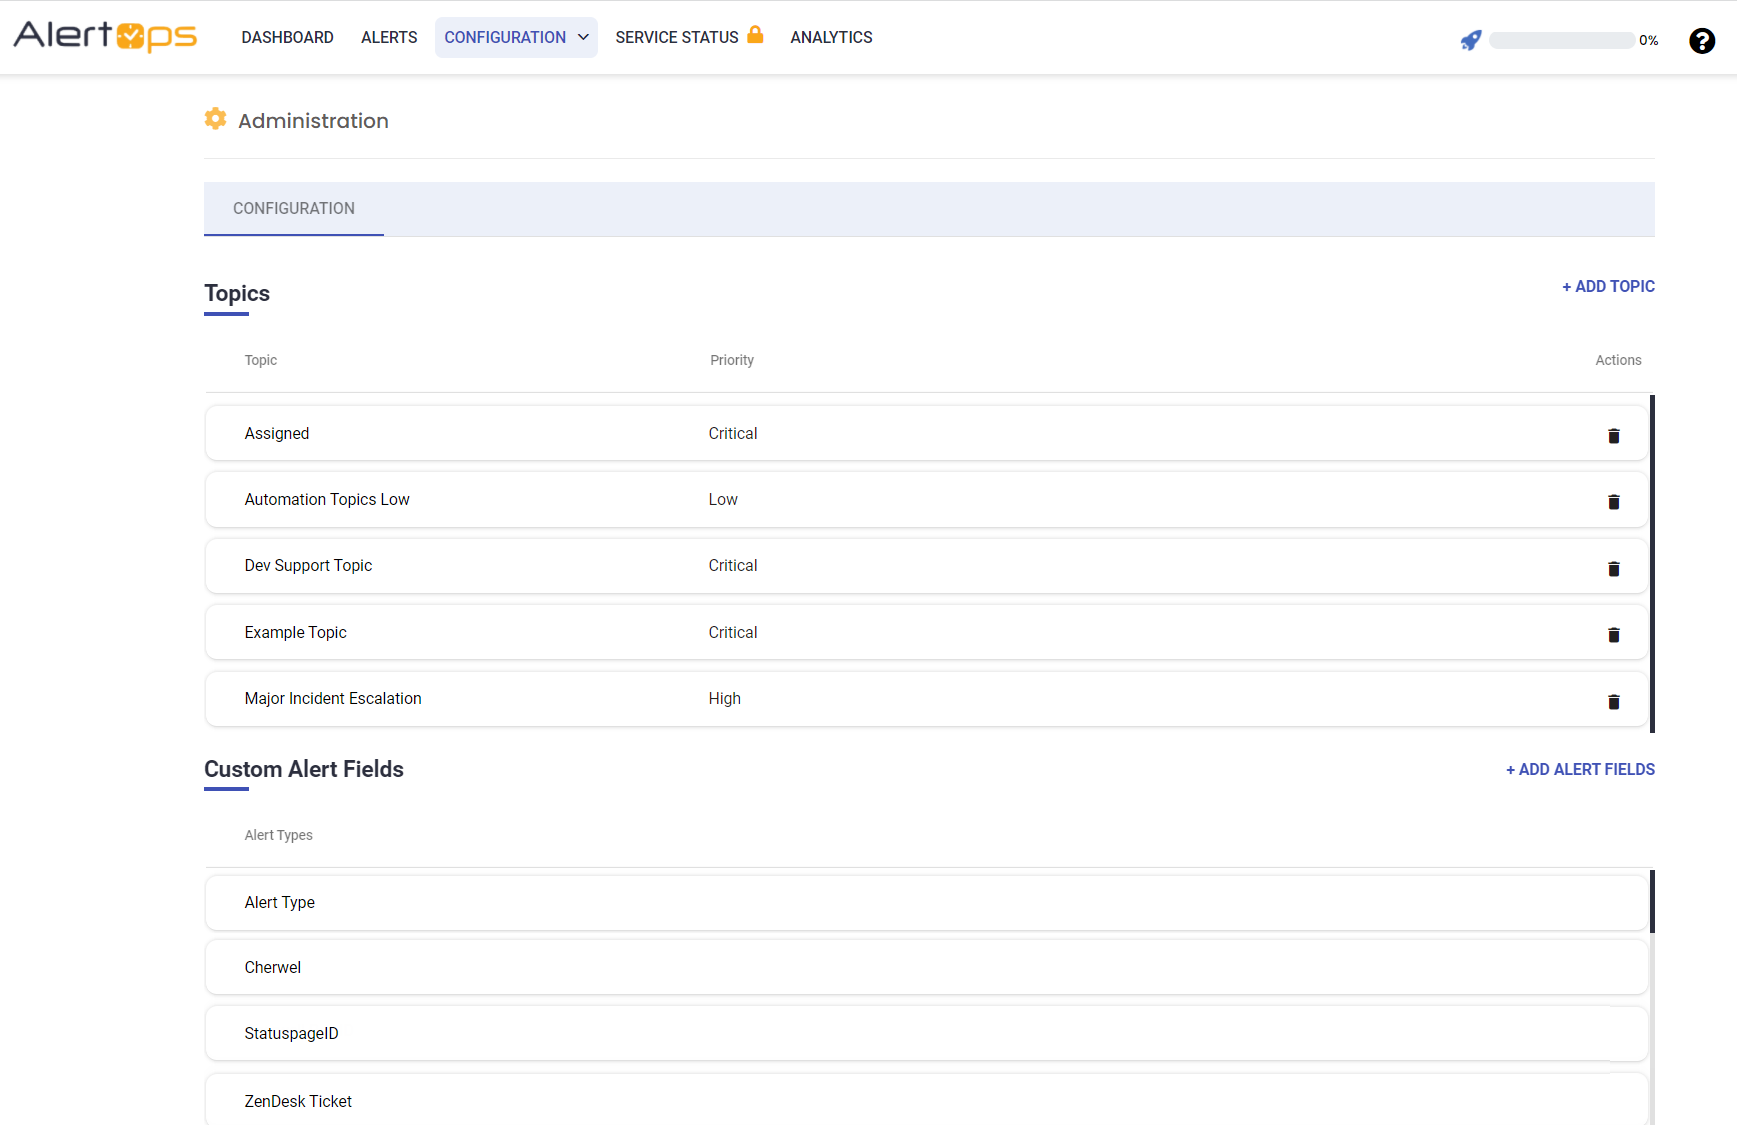
Template Name: Zendesk Ticket
Add the following attributes to the Standard Alert Template (Administration -> Templates)
Name: Customer Name
Data Type: short string
Active: true
Name: Customer Email
Data Type: short string
Active: true
Name: Ticket ID
Data Type: short string
Active: true
Create the Outbound Service
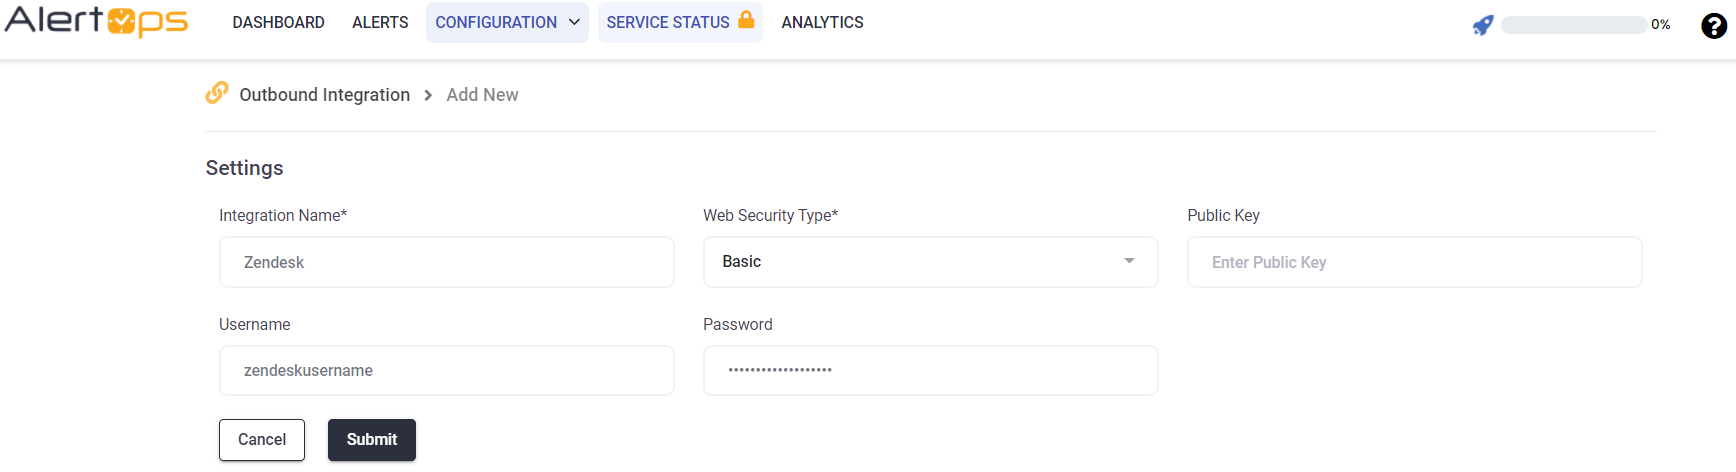
Enter the Service Name “Zendesk”.
Web Security Type = Basic
Username = (zendeskuser name * user must have permissions to create and modify tickets)
Password = (zendesk user password)
From the Service Detail screen, click Add Method.
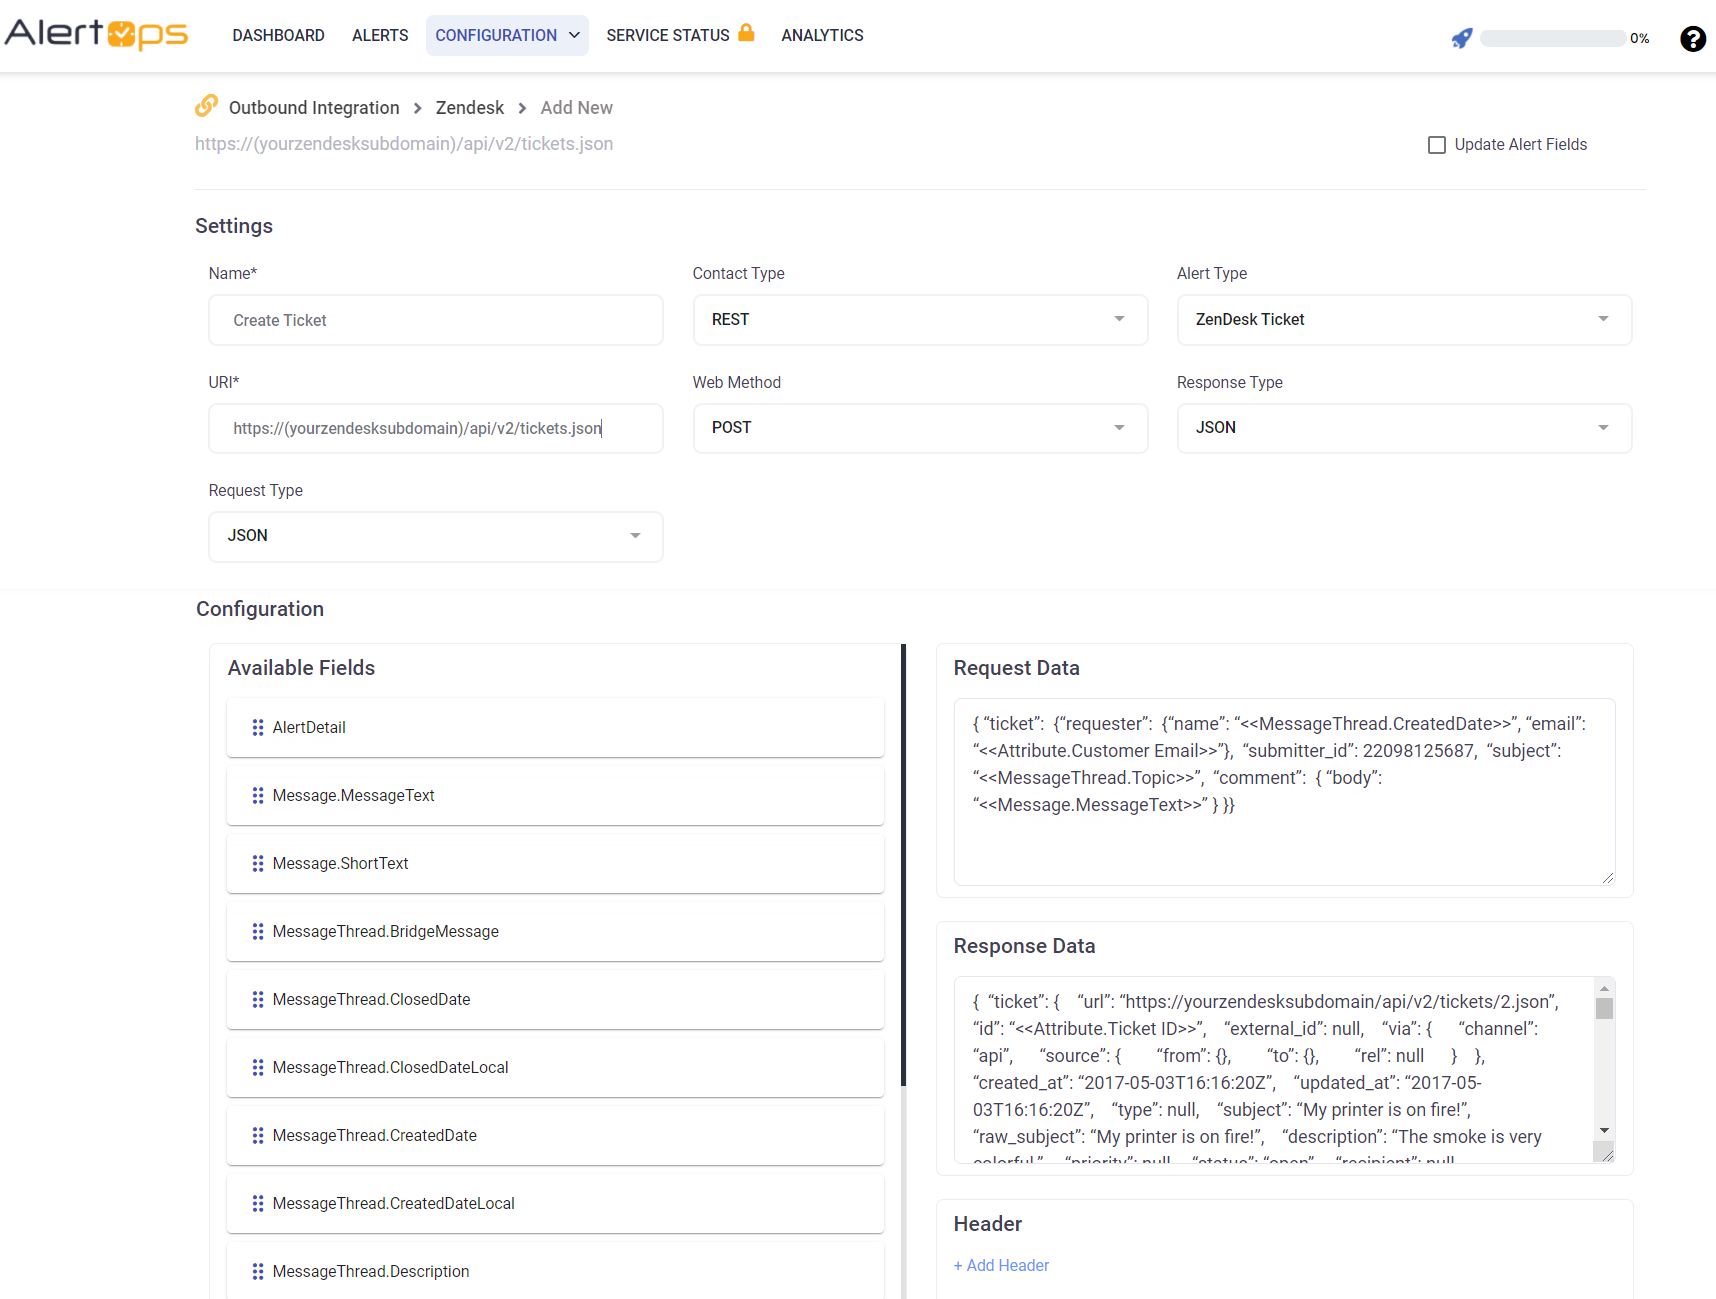
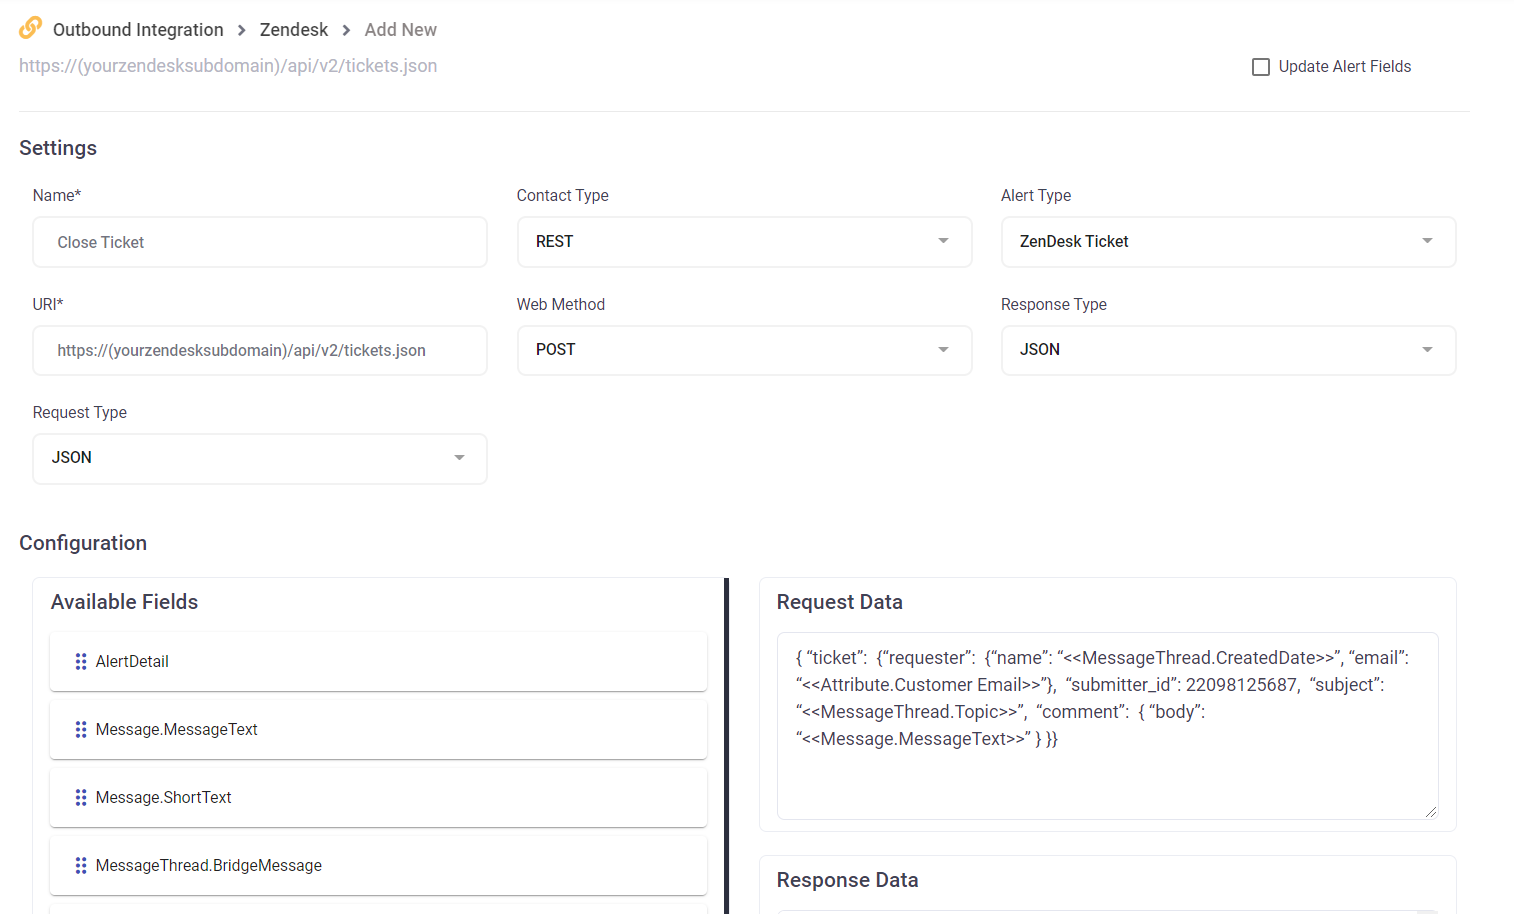
Method Name: Create Ticket
Service Type: REST
Template Type: Zendesk Ticket
URI: https://(yourzendesksubdomain)/api/v2/tickets.json
Content Type: JSON
Web Method: POST
Response Data Type: JSON
Response Action: Update Alert Fields = true
Request Data:
{ “ticket”: {“requester”: {“name”: “<
Response Data:
{ “ticket”: { “url”: “https://yourzendesksubdomain/api/v2/tickets/2.json”, “id”: “<
”, “plain_body”: “The smoke is very colorful.”, “public”: true, “attachments”: [], “audit_id”: 296605396767 }, { “id”: 296605397367, “type”: “Create”, “value”: “22104712247”, “field_name”: “requester_id” }, { “id”: 296605397407, “type”: “Create”, “value”: “My printer is on fire!”, “field_name”: “subject” }, { “id”: 296605397447, “type”: “Create”, “value”: “open”, “field_name”: “status” }, { “id”: 296605397487, “type”: “Create”, “value”: null, “field_name”: “priority” }, { “id”: 296605397527, “type”: “Create”, “value”: null, “field_name”: “type” }, { “id”: 296605397547, “type”: “Create”, “value”: “22098125687”, “field_name”: “assignee_id” }, { “id”: 296605397587, “type”: “Create”, “value”: “41944047”, “field_name”: “group_id” }, { “id”: 296605397627, “type”: “Notification”, “via”: { “channel”: “rule”, “source”: { “to”: {}, “from”: { “id”: 309061307, “title”: “Notify all agents of received request” }, “rel”: “trigger” } }, “subject”: “[{{ticket.account}}] {{ticket.title}}”, “body”: “A ticket (#{{ticket.id}}) by {{ticket.requester.name}} has been received. It is unassigned.\n\n{{ticket.comments_formatted}}”, “recipients”: [ 22098125687 ] } ] }}The smoke is very colorful.
Add the Create Ticket Method
Add the Close Ticket Method
From the Service Detail screen click Add Method.
Method Name: Close Ticket
Service Type: REST
Template Type: Zendesk Ticket
URI: https://(yourzendesksubdomain)/api/v2/tickets.json
Content Type: JSON
Web Method: PUT
Response Data Type: JSON
Response Action: Update Alert Fields = falseRequest Data:
{“ticket”: {“status”: “closed”, “comment”: { “body”: “<
Create the Add Comment Method
From the Service Detail screen click Add Method.
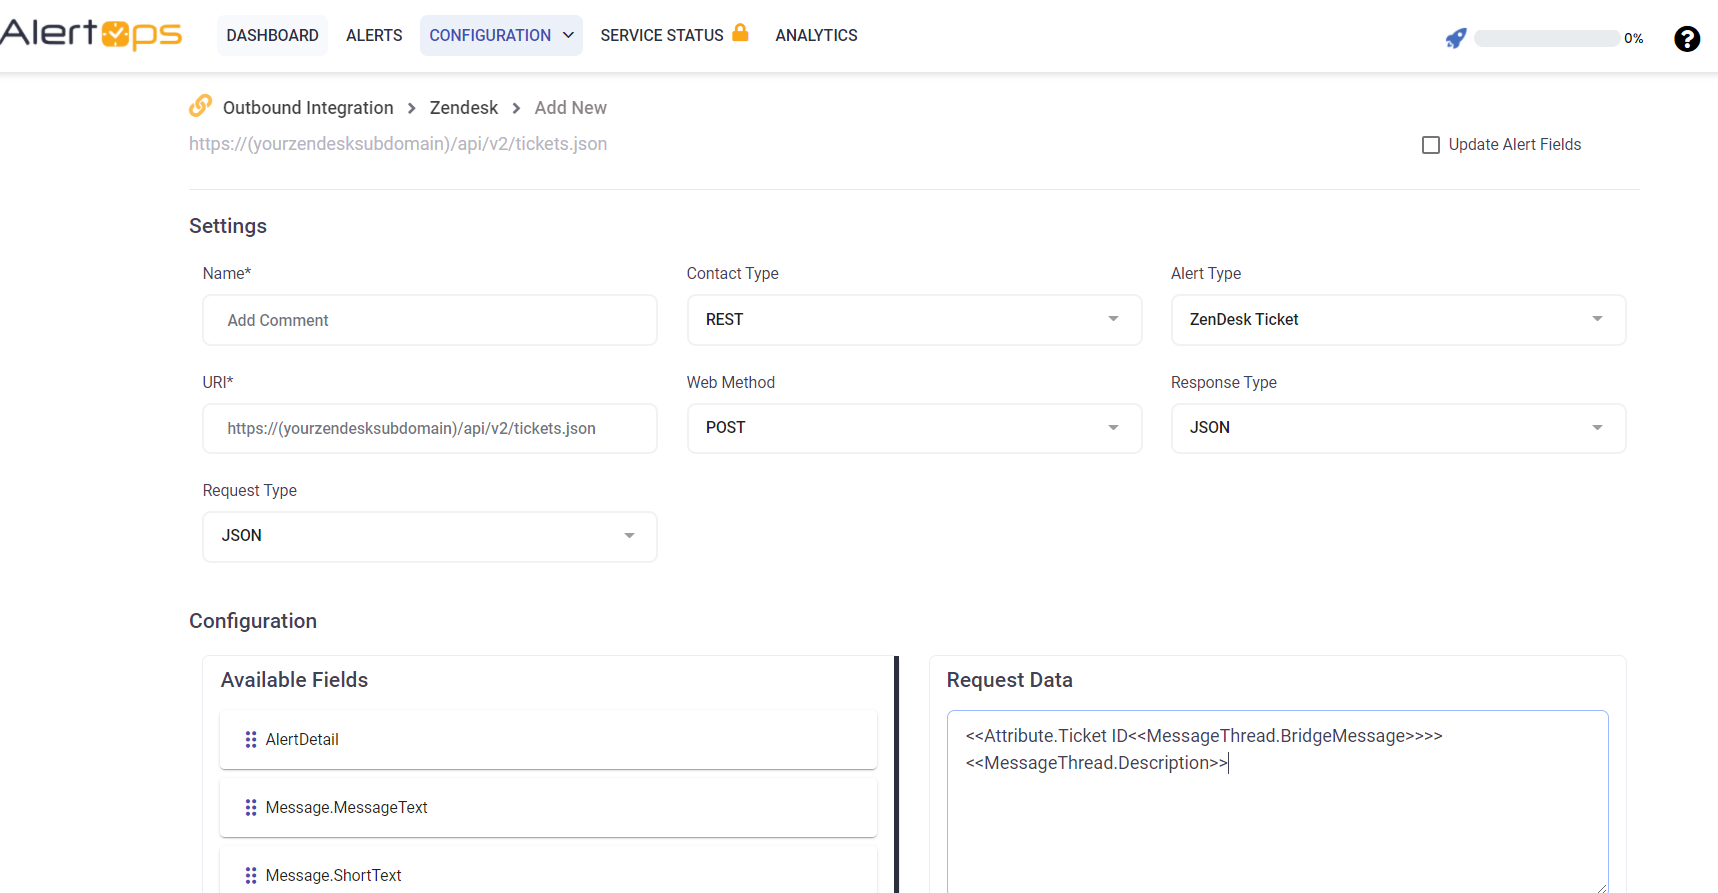
Method Name: Add Comment
Service Type: REST
Template Type: Zendesk Ticket
URI: https://(your zendesk subdomain)/api/v2/tickets/<
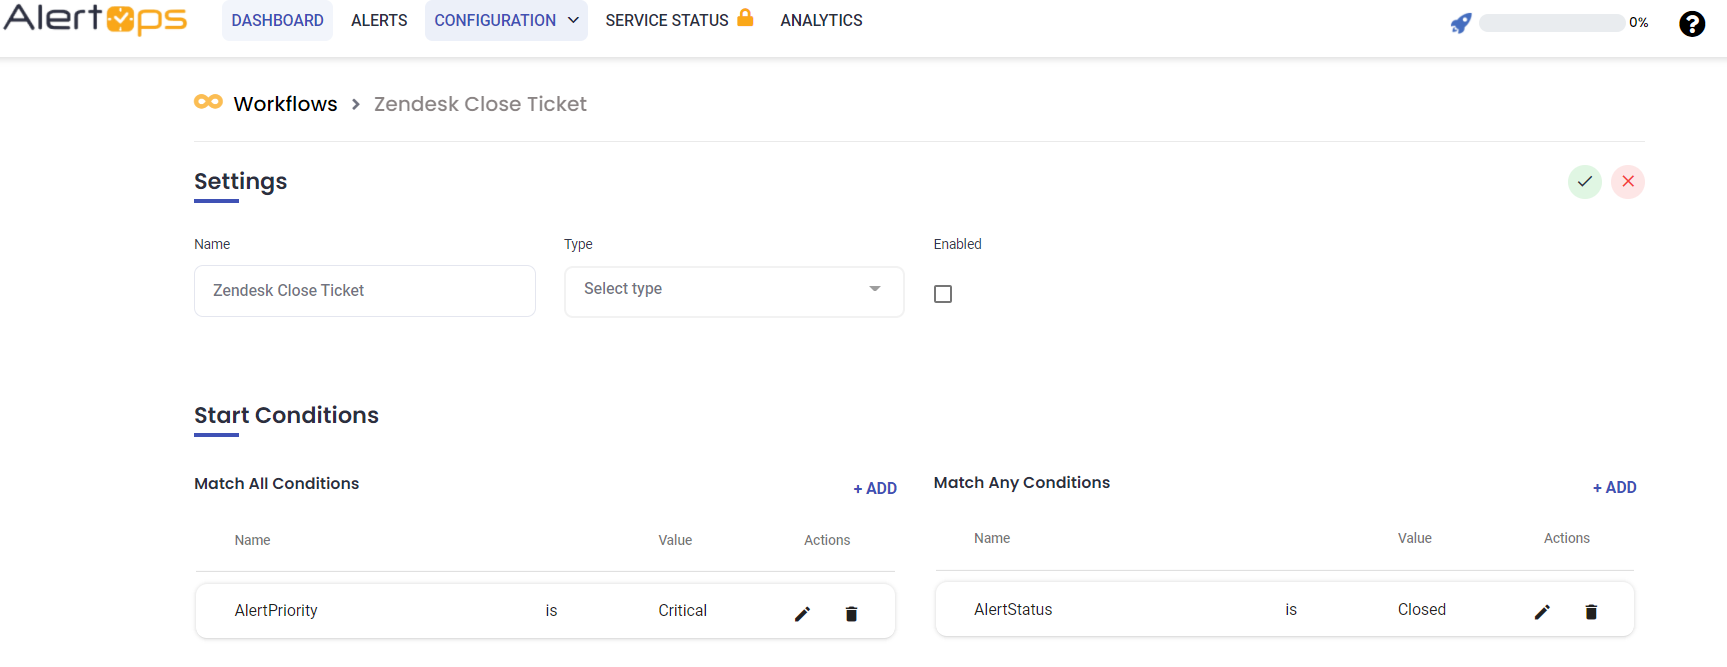
Create the Close Ticket Workflow
Workflow Name: Zendesk Close Ticket
Workflow Type: Message Thread
Template: Zendesk Ticket
Scheduled: false
Enabled: trueStart Conditions:
MessageThreadStatusType = closed AND
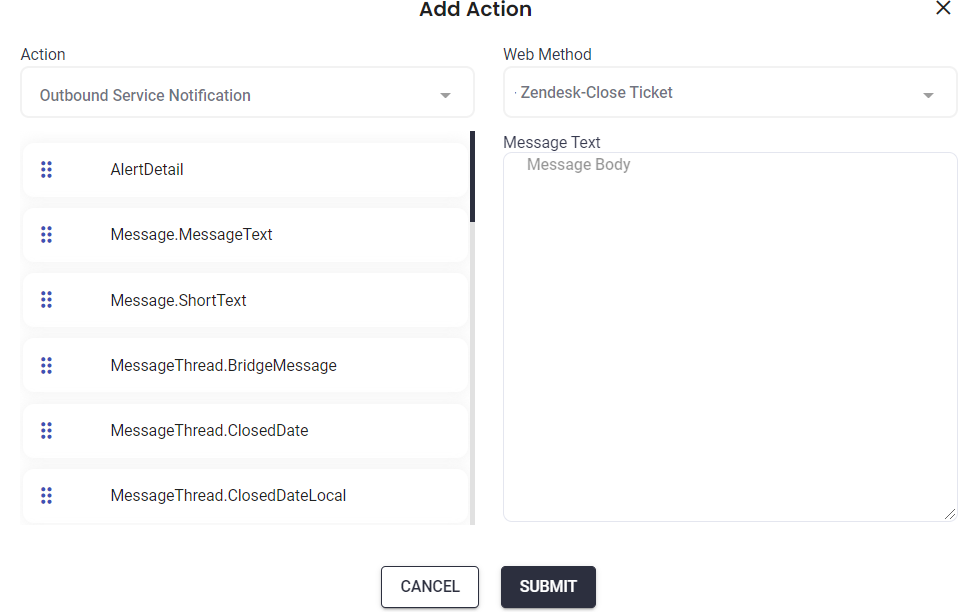
Actions:
Action: Outbound Service Notification
Outbound Action: Zendesk – Close Ticket
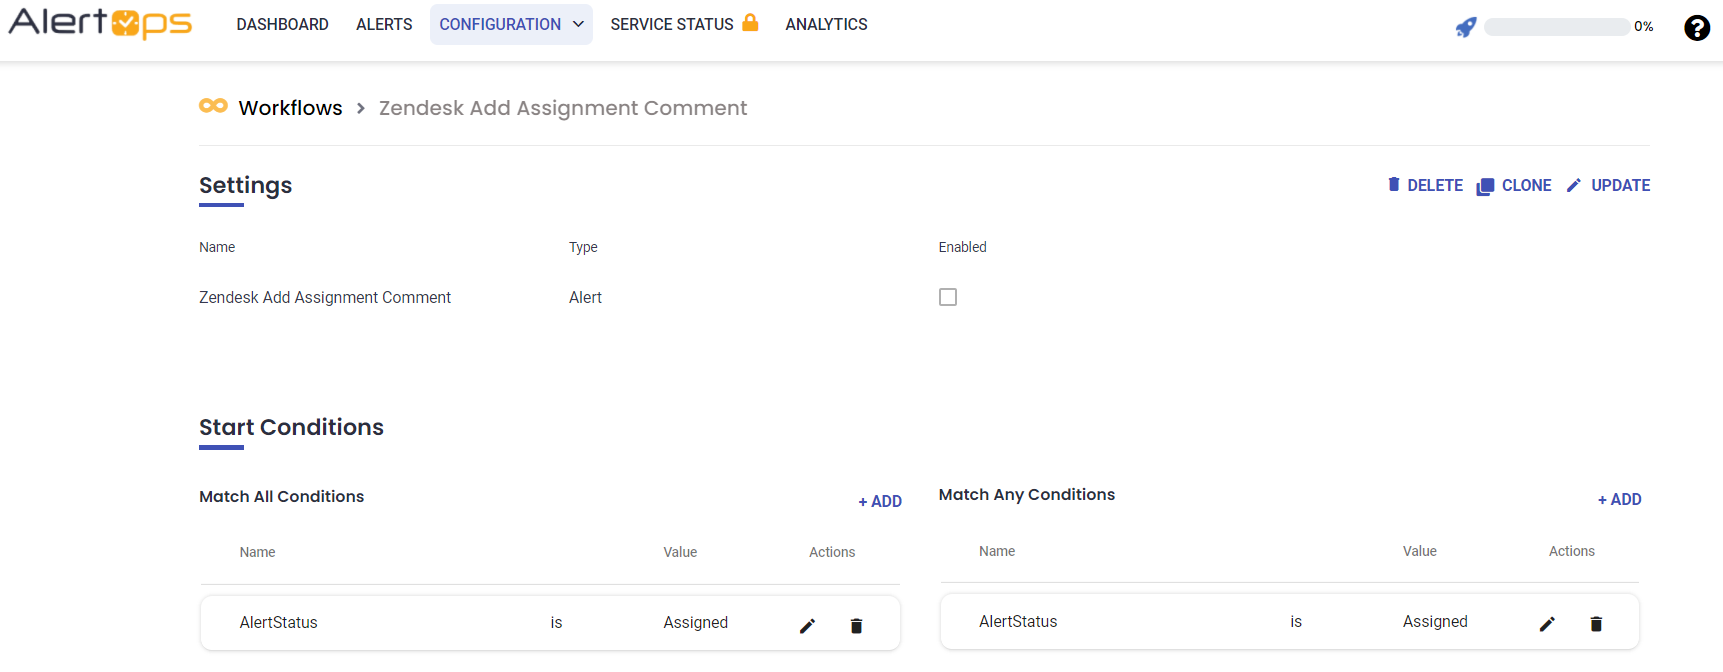
Create the Add Assignment Comment Workflow
Workflow Name: Zendesk Add Assignment Comment
Workflow Type: Message Thread
Template: Zendesk Ticket
Scheduled: false
Enabled: trueStart Conditions:
MessageThreadStatusType = assigned AND
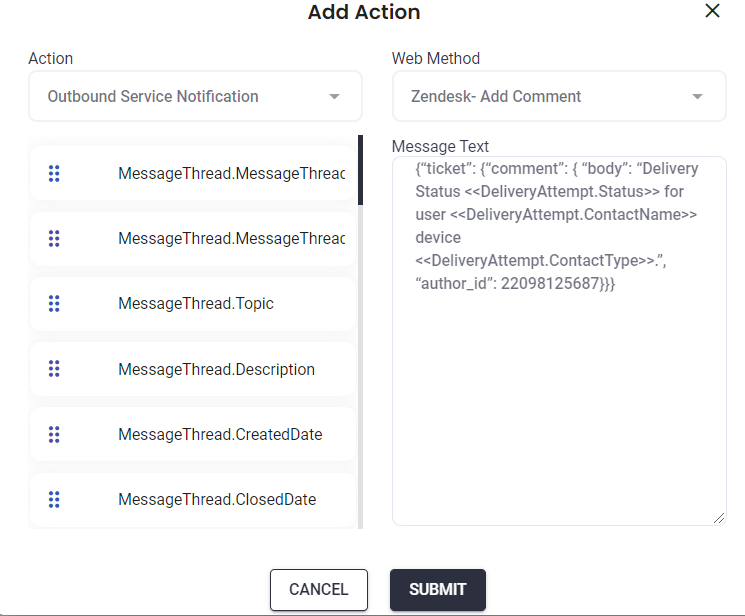
Actions:
Action: Outbound Service Notification
Outbound Action: Zendesk – Add Comment
Message Text: {“ticket”: {“comment”: { “body”: “Ticket has been assigned to <
Create the Add Delivery Status Update Workflow
Workflow Name: ZenDesk Add Delivery Status Update
Workflow Type: DeliveryAttempt
Enabled: trueStart Conditions:
DeliveryStatusType = sent OR
DeliveryStatusType = acknowledged OR
DeliveryStatusType = failed OR
DeliveryStatusType = delivered OR
Actions:
Action: Outbound Service Notification
Outbound Action: Zendesk – Add Comment
Message Text: {“ticket”: {“comment”: { “body”: “Delivery Status <
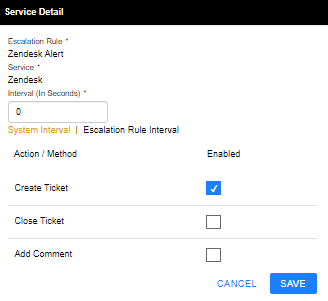
Create the Zendesk Escalation Rule
Escalation Rule – Zendesk Alert
Detail
Rule Name: Zendesk Alert
Description: Zendesk Alert
Priority: Critical
Enabled: true
Quick Launch: false
Workflows
Filter by… Message ThreadWorkflows:
Zendesk Add Assignment Comment
Zendesk Add Delviery Status Update
Zendesk Close TicketOthers:
Thread Template
Services:
Zendesk
Service Action: Create Ticket


Was this article helpful?