Send a message when an alert closes automatically
- 17 Jul 2023
- 3 Minutes to read
- Print
- DarkLight
- PDF
Send a message when an alert closes automatically
- Updated on 17 Jul 2023
- 3 Minutes to read
- Print
- DarkLight
- PDF
Article summary
Did you find this summary helpful?
Thank you for your feedback!
The following entitlements are required to make changes to Workflows:
- Workflows_Update - Create, Update, and Delete Workflows
- Workflows_View - View existing Workflows
The user roles with access to these integration entitlements are Owner and App Admin.
In this example, we will create a workflow that sends a message to responders when an alert is closed by the Integration. The workflow will have a one-to-one relationship with the Inbound Integration, as we will explicitly reference the close condition in that Integration.
Create a Custom Alert Field
- Click Configuration on the menu bar and select Administration.
- In the Custom Alert Fields section select Standard Alert
- Once redirected to the Standard Alert detail page, click the Add Alert Fields button on the top right of the screen.
- Enter SourceStatus for the Alert Type Name and select Short String for the Data Type.
- Click Submit to save.
(1).png)
Map the Custom Alert Field to an Integration
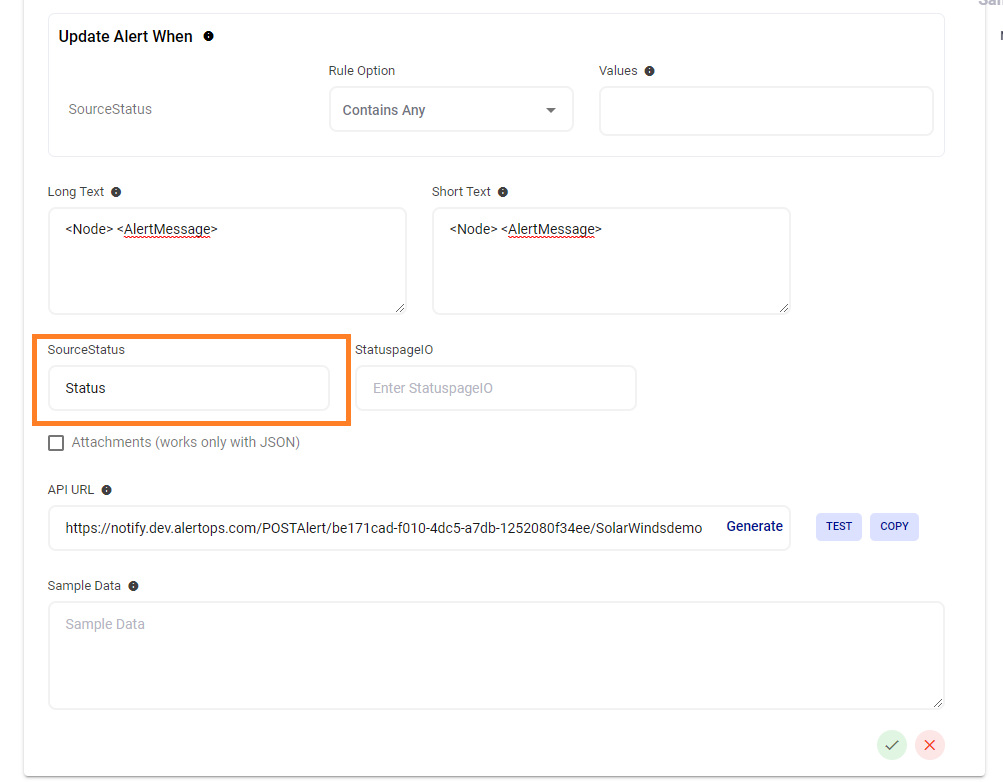
- From Advanced Settings tabs of an Inbound Integration, expand Rules for Opening and Closing an Alert. Note the field mapped to the default SourceStatus field, as well as the value for Close Alert When. In this example, using a SolarWinds Integration, the SourceStatus field is mapped to the Status field of the inbound data, and the Value for Close is "Up".
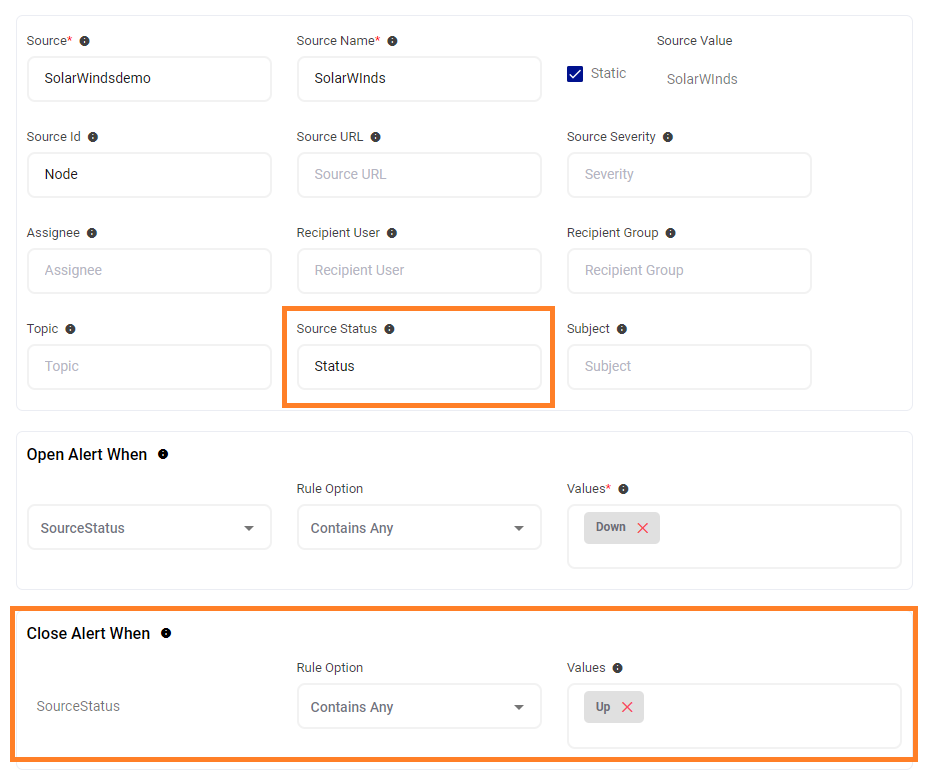
- In the same tab, scroll down to Custom Alert Fields, which are displayed under the long and short text messages. Enter the same field used above into the Custom Alert Field. This will populate the Custom Alert Field with the same value used to auto close the alert.
- Click the green checkmark to save changes to the Integration.
Create Workflow
The next step is to create a workflow which sends an email notification when an alert is closed automatically.
- Click Configuration on the main menu and select Workflows.
- Click the Add Workflow button in the top right of the screen.
- In the resulting form, enter a Name for the workflow and in the Type drop down choose "Alert"
- Set the Alert Type to the one containing the Custom Alert Field we just created. In this case we saved to the Standard Alert.
- Click Submit to save changes.
(15)(1).png)
Add Start Conditions
Once the workflow has been saved, we can add a Start Conditions.
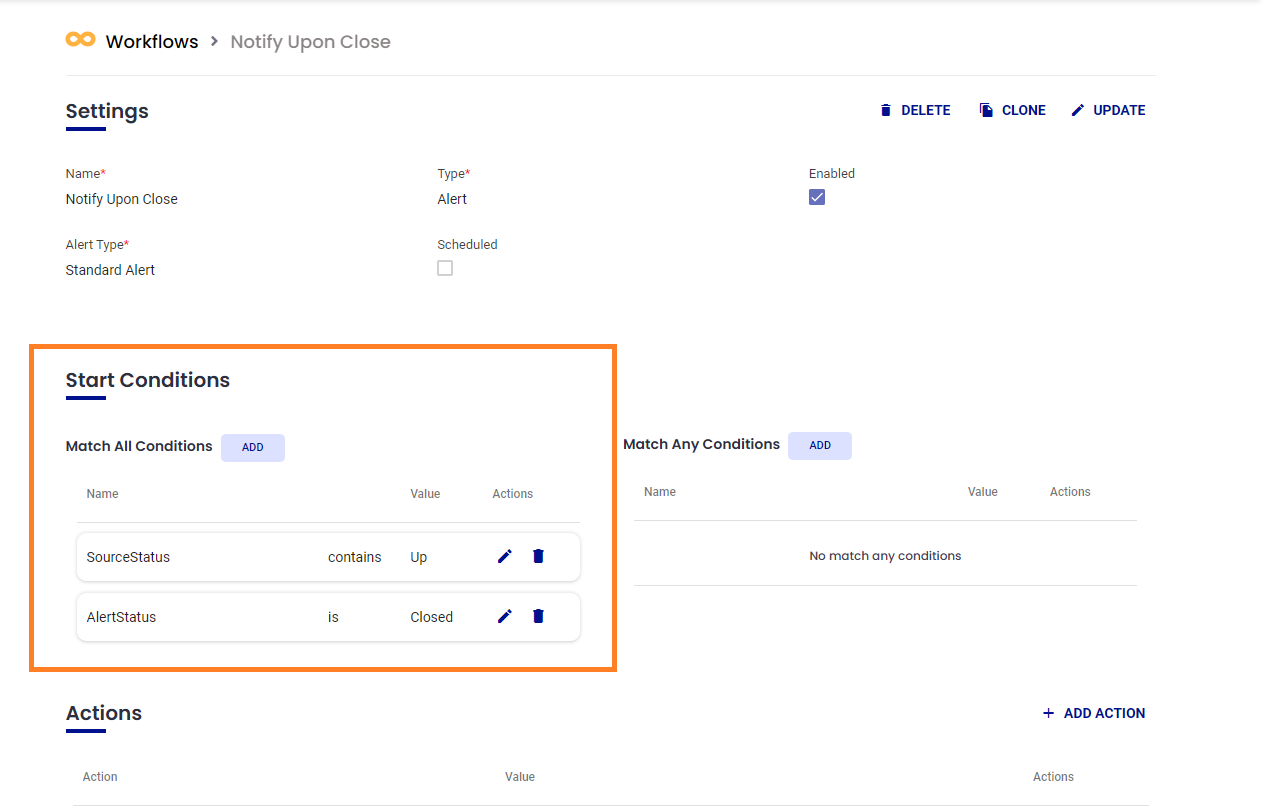
- Scroll down to the Start Conditions section and Click the Add button. In this Example we will use Match All Conditions.
- In the dropdown for Name, select "AlertStatus".
- Set "Closed" as the Value and press the green checkmark to save.
- Add another Start Condition under Match All. This time, select the custom attribute we created from the dropdown. Recall our custom attribute in this example is "SourceStatus".
- Set the Value to Up, and press the green checkmark.
Add Actions
- Scroll down to Actions and click Add Action to the right of the screen.
- In the resultant dialog, select SendMessage from the Action dropdown.
- Select an Escalation Policy to govern the routing of the update message, then choose the recipient.
- In this scenario, we want to notify the Original Recipients, so we will check that box.
- In the Message Text box, you can craft the body of the message using static text and/or keywords from the list on the left.
- Save the changes to the Action, and this will update the Workflow.
(11)(1).png)
Add Workflow to Escalation Policy
- Ensure the new Workflow we just created is Enabled by checking the enabled box in the settings section of the workflow.
- Click Configuration on the menu and select Escalation Policies.
- Select the Escalation policy you want associated with the new workflow. Note that the Escalation Policy for the Action must be independent of the Escalation Policy this Workflow is applied to (e.g., This Workflow cannot be applied to the “reply to alert” policy, as that rule was chosen to govern the delivery of the update within the Workflow). Any Escalation Policy already used in a Workflow cannot have additional Workflows applied, and the Add Workflow button will be greyed out.
- Expand the Automation tab and click the Add Workflow button to the right of the screen.
- In the resulting dialog, select your Workflow (it must be enabled to be present here) and press the arrow button to move it to the Selected Workflows list.
- Click Submit and the new Workflow is added to the Escalation Policy and saved.
(7)(2).png)
Now, when the Integration closes the alert, the original responders will receive the following message:
(4).png)
Was this article helpful?