Autotask
- 09 Apr 2024
- 9 Minutes to read
- Print
- DarkLight
- PDF
Autotask
- Updated on 09 Apr 2024
- 9 Minutes to read
- Print
- DarkLight
- PDF
Article summary
Did you find this summary helpful?
Thank you for your feedback
Autotask Integration Guide
Datto’s Autotask Professional Services Automation (PSA) is a powerful and intuitive cloud-based PSA platform. This article will provide a walkthrough of an inbound integration between AlertOps’ alert management platform and Autotask to receive alerts based on tickets created in the Autotask platform.
AlertOps Inbound Integration Configuration
- From the main menu, click on Configuration and select Integrations from the submenu.
- In the Inbound Integration section, select API from the integration type dropdown menu.
- Click the +ADD API button.

- You will be redirected to a list of API integration templates. Select Custom from the list.
- To set up the integration, enter a name and select an Escalation Policy to guide escalations coming from this Integration, as well as recipient group(s) or recipient user(s).
- Click the Submit button to save.
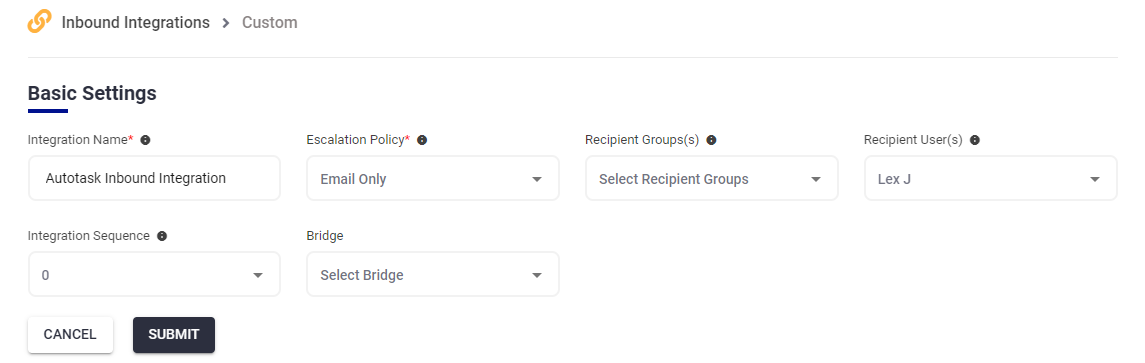
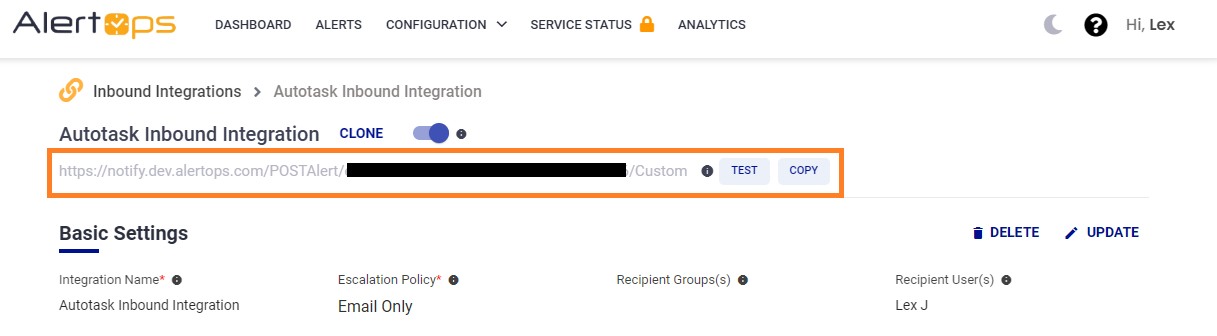
- Copy the integration webhook URL for use in the next steps.


Autotask Configuration
Update Security Roles
The first step we need to take is to add a security level that allows the creation of webhooks.
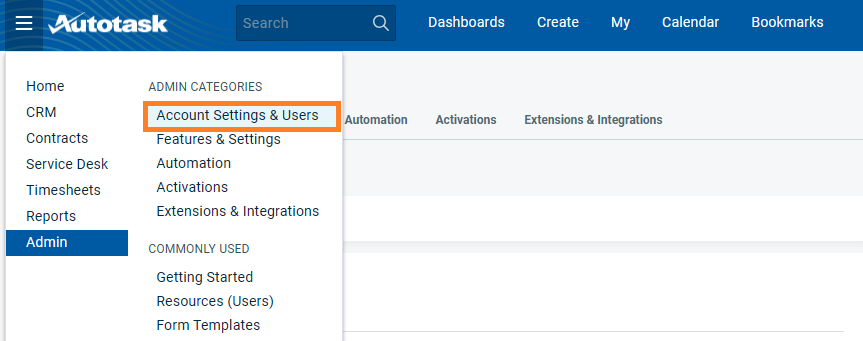
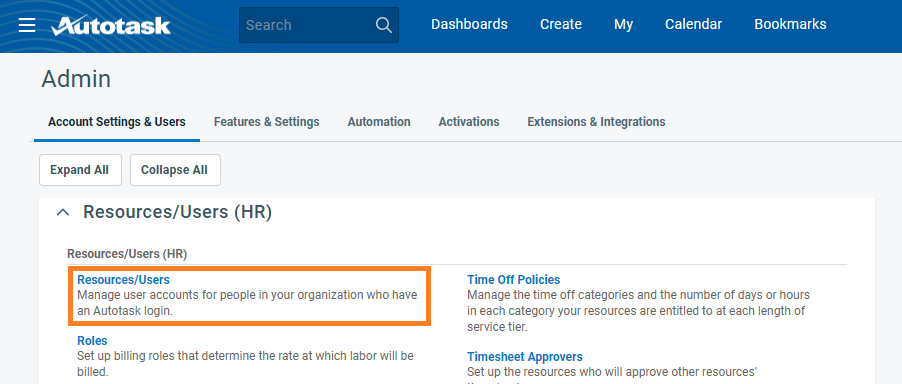
- In Autotask, click the ≡ Menu and select Admin > Account Settings & Users
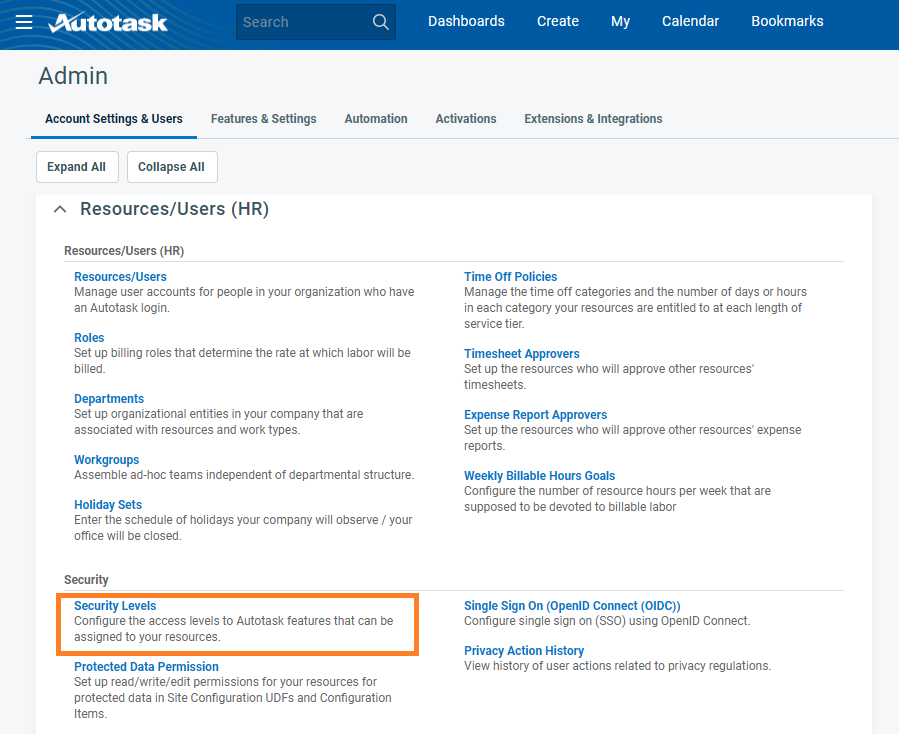
- Click Security Levels.
- Click ≡ next to API User (system) (API-only) security level and select Copy.
- In the security details, expand the Other section.
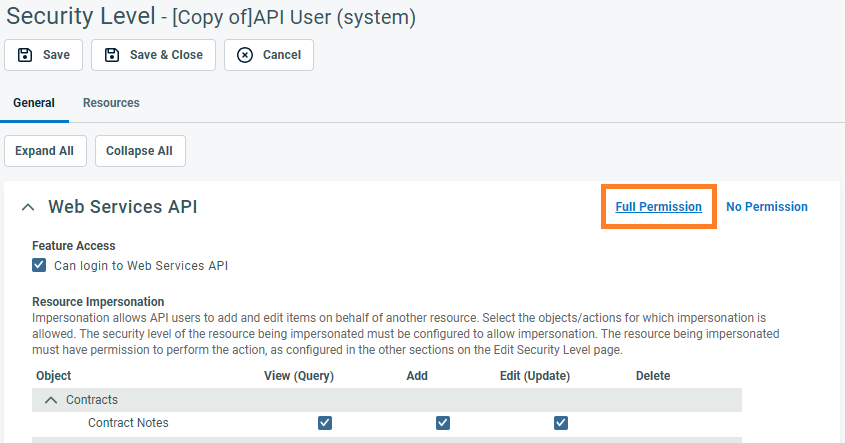
- Select the Can create WebHooks check box and enter the maximum number of webhooks users with this security level will be allowed to create.
.png)
- Scroll down to Web Services API and click Full Permission to add all API permissions to this role.
- Click Save and Close.


.png)

Create API User
Conversations between Autotask's API and integrated software require authentication. To facilitate this communication, you'll need to set up a dedicated Autotask user account with an API User security level. Regular Resource accounts, even if they have admin security levels, are not sufficient.
- In Autotask, click the ≡ Menu and select Admin > Account Settings & Users
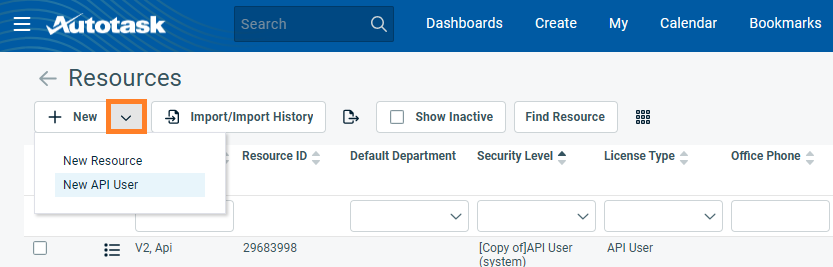
- Click Resources/Users
- Click the down arrow next to the New button and select New API User.
- Complete all General fields marked as required. For the dedicated API security level, select the [Copy of] API User (system) we just created.
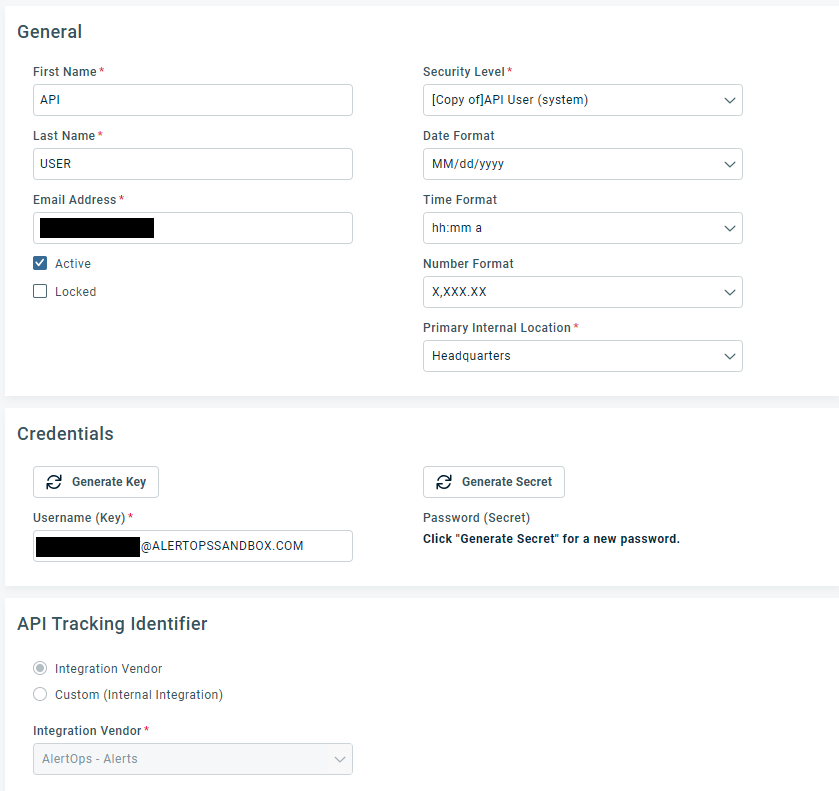
- Generate and safely store the Username and Secret for this user.
- Select your Integration Vendor from the dropdown.
- Click Save and Close to create the user.


Once completed, we will use your API User credentials to create a webhook.
Autotask Outbound Integration Guide
AlertOps Outbound Integration Configuration
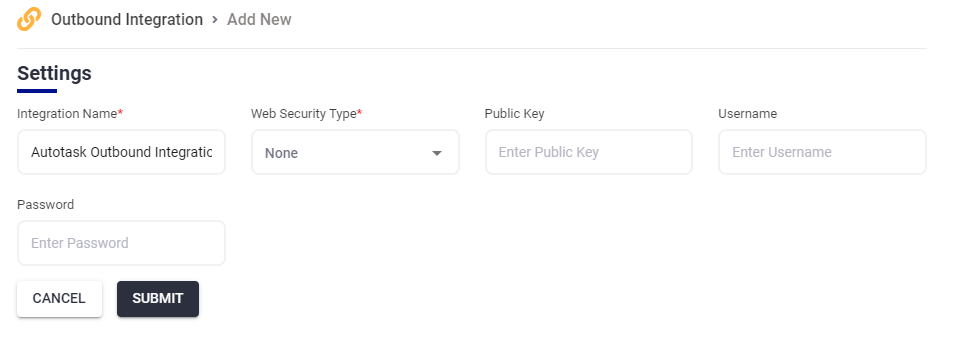
To create the Outbound Integration:
- Click Configuration on the main menu and select the Integrations menu.
- In the Outbound Integrations section, click the Add Outbound button.
- Set the Integration Name as Autotask Outbound Integration.
- Set None for Web Security Type.
- Click Submit to create the integration.

Autotask Configuration
The API calls needed for this integration require API User credentials with an updated user role. Instructions to create an API user can be found in the Inbound Integration Guide. Follow the configuration instructions to update security roles and set up an API user if you have not previously. Once complete you will have access to the API Username, API user secret, as well as the API Tracking Identifier which will be needed in the next steps.
Create Methods
Once the integration has been saved, we can now create Methods that will allow us to make automated changes in Autotask.
To create a Method, click the Add Method button on the right.
Create Ticket Method
Configure a method to create a ticket in Autotask:

- Select a name for the method. In this example, this method is named Create a Ticket.
- Choose POST for the Request Method.
- For the URI, the root will be your Autotask Zone.
- The Request Data sample below contains several required fields to create a ticket. Set the values according to your organization's requirements.
- the picklist values for companyID, priority, queueID, status can be found with a GET call.
- The value for resourceID can be found in your Autotask environment. Go to Admin> Account Settings & Users> Resources/Users(HR)> Resources/Users(HR). The resourceID will reside in the second column of the list. For this call, we recommend using the API resourceID.
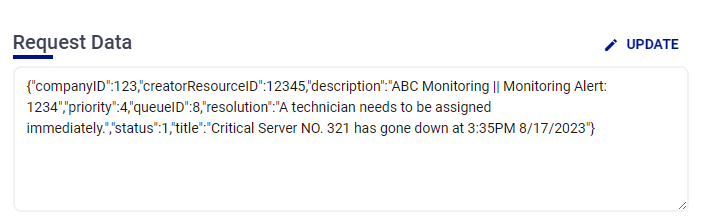
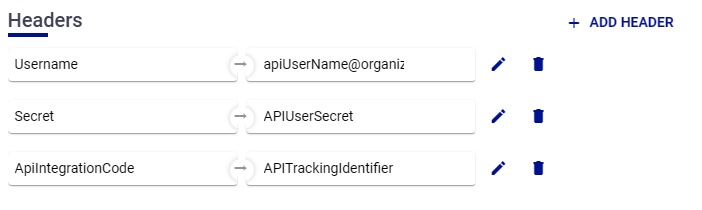
- Set 3 Headers as the final configuration for this method, Username, Secret, and ApiIntegrationCode with the values from Autotask API Username, API user secret, as well as the API Tracking Identifier respectively.
.png)

.png)
https://YourAutotaskZone.autotask.net/ATServicesRest/v1.0/Tickets{"companyID":123,"creatorResourceID":1234567,"description":"Ticket Description","priority":4,"queueID":8,"resolution":"Ticket Resolution","status":1,"title":"Ticket Title"}Update Status Method
Configure a method to update a ticket status in Autotask:

- Select a name for the method. In this example, the method is named Update Status.
- Choose PATCH for the Request Method.
- The Request Data sample below contains two required fields to create a ticket. Set the values according to your organization's requirements.
- The id is the ticket identifier and can be mapped to SourceIdentifier.
- the picklist values for status can be found with a GET call.
.png)
- Set 3 Headers as the final configuration for this method, Username, Secret, and ApiIntegrationCode with the values from Autotask API Username, API user secret, as well as the API Tracking Identifier respectively.
.png)
https://webservices2.autotask.net/ATServicesRest/v1.0/Tickets{"id":<<Alert.SourceIdentifier>>,"status":8}Assign User Method
Configure a method to assign a user to a ticket in Autotask:

- Select a name for the method. In this example, the method is named Assign User.
- Choose PATCH for the Request Method.
- For the URI, the root will be your Autotask Zone.
- Check the Update Alert Fields box.
- The Request Data sample below contains the required fields to update a ticket status.
- The value of 'id', which is the ticket identifier, can be mapped to the Source Identifier alert field.
- The resource ID is an Autotask user identifier and the value can be found in your Autotask environment. In Autotask, go to Admin>Account Settings/Users>Resources/Users (HR)>Resources/Users. The resource ID will be found in the second column.
- The role ID for this resource can be found with a GET request. NOTE: A resource must have a default Service role configured in order to be assigned tickets.
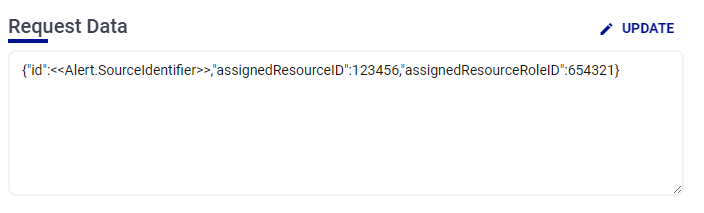
- Add 3 Headers as the final configuration for this method: Username, Secret, and ApiIntegrationCode. The API user credentials (Username, Secret, and Tracking Identifier) were created in the inbound integration guide. Follow these instructions to create an API user if you have not previously.


https://YourZone.autotask.net/ATServicesRest/v1.0/Tickets{"id":<<Alert.SourceIdentifier>>,"assignedResourceID":resourceID,"assignedResourceRoleID":roleID}Add Note to Ticket Method
Configure a method to add a note to a ticket in Autotask:

- Select a name for the method. In this example, the method is named Add Note to Ticket.
- Choose POST for the Request Method.
- For the URI, the root will be your Autotask Zone.
- Check the Update Alert Fields box.
- The Request Data sample below contains the required fields to update a ticket status.
- The resource ID is an Autotask user identifier and can be found in your Autotask environment. In Autotask, go to Admin>Account Settings/Users>Resources/Users (HR)>Resources/Users. The resource ID will be found in the second column. The selected ID will be reflected as the note author.
- The picklist values available for 'noteType' and 'publish' can be found with a GET request.
- The value of 'ticketId', which is the ticket identifier, can be mapped to the Source Identifier alert field.

- Add 3 Headers as the final configuration for this method: Username, Secret, and ApiIntegrationCode. The API user credentials (Username, Secret, and Tracking Identifier) were created in the inbound integration guide. Follow these instructions to create an API user if you have not previously.

https://YourZone.autotask.net/ATServicesRest//V1.0/Tickets/<<Attribute.ticketID>>/Notes{"creatorResourceID":resourceID,"noteType":noteTypeID,"publish":publishID,"description":"This is the note body","ticketID":<<Attribute.ticketID>>,"title":"This is the note title"}Configure Workflows
Once the methods have been created, we can now configure Workflows to trigger the method actions.
To create a Workflow click Configuration on the main menu and select Workflows. From the Workflow page, click the +ADD WORKFLOW button.

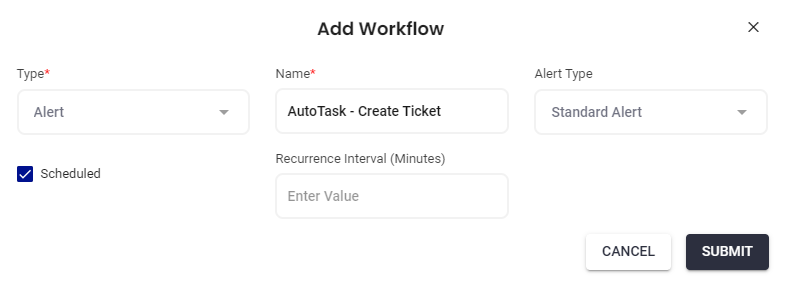
Create Ticket Workflow
This workflow will create a trigger for the Create Ticket Method:
- For Type, select Alert and name the workflow. In this example, the workflow is named Autotask - Create Ticket.
- Select Standard Alert for Alert Type.
- This workflow will have start conditions based on time intervals, so check the Scheduled box.

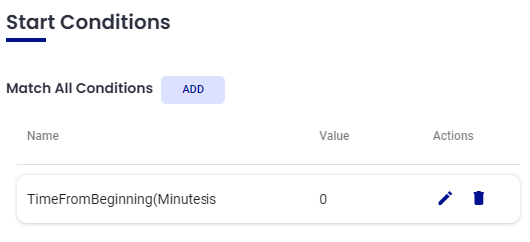
Start Conditions
Once the workflow has been saved, you can add Start Conditions:
- Click the ADD button for Match All Conditions.
- Select TimeFromBeginning(Minutes) from the condition name dropdown.
- Select is for the Operator.
- Enter a value of 0, and click the green checkmark to save this condition.

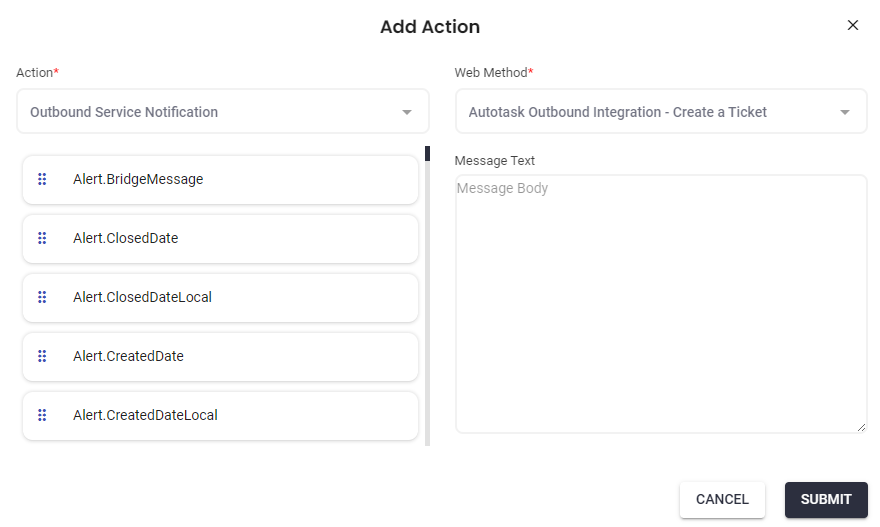
Actions
- Scroll down to the Actions section and click the +Add Action button on the right.
- Select Outbound Service Notification from the Action dropdown menu.
- Select the Create Ticket Method from the Web Method dropdown menu. Methods will have their integration listed in the title.
- Click the Submit button to associate this method with this workflow.

As a final step, click the Update button in Settings, check the Enabled box, and click the green arrow to save. This workflow will now be ready for use. 
Update Status Workflow
This workflow will create a trigger for the Update Status Method:
- For Type, select Alert and name the workflow. In this example, the workflow is named Autotask - Update Status.
- Select Standard Alert for Alert Type.
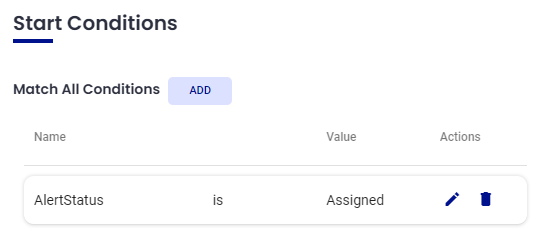
Start Conditions
Once the workflow has been saved, you can add Start Conditions:
- Click the ADD button for Match All Conditions.
- Select AlertStatus from the condition name dropdown.
- Select is for the Operator.
- Select a value for status you would like to base this condition on. In this example, we have chosen Assigned.
- Click the green checkmark to save this condition.

Actions
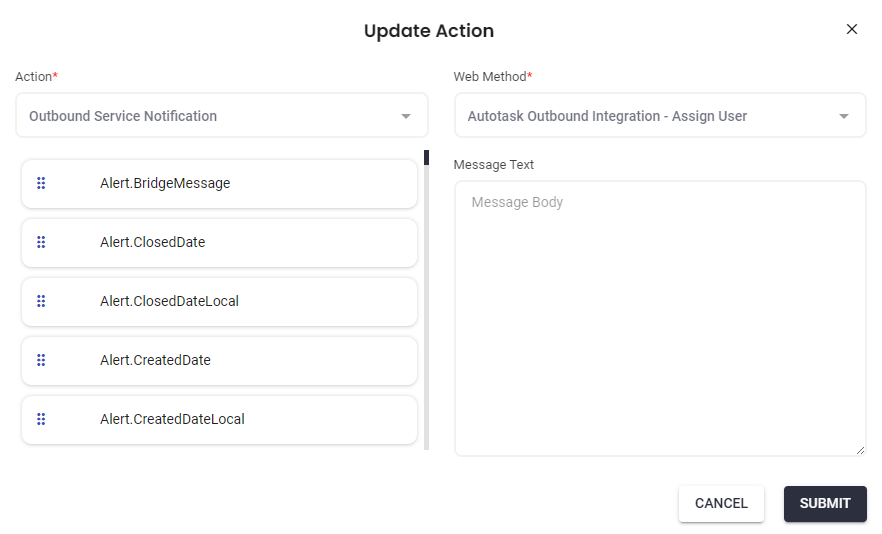
- Scroll down to the Actions section and click the +Add Action button on the right.
- Select Outbound Service Notification from the Action dropdown menu.
- Select the Update Status Method from the Web Method dropdown menu. Methods will have their integration listed in the title.
- Click the Submit button to associate this method with this workflow.


As a final step, click the Update button in Settings, check the Enabled box, and click the green arrow to save. This workflow will now be ready for use.
Assign User Workflow
This workflow will create a trigger for the Assign User Method:
- For Type, select Alert and name the workflow. In this example, the workflow is named Autotask - Assign User.
- Select Standard Alert for Alert Type.
Start Conditions
Once the workflow has been saved, you can add Start Conditions:
- Click the ADD button for Match All Conditions.
- Select AlertStatus from the condition name dropdown.
- Select is for the Operator.
- Select a value for status you would like to base this condition on. In this example, we have chosen Assigned.
- Click the green checkmark to save this condition.
Actions
- Scroll down to the Actions section and click the +Add Action button on the right.
- Select Outbound Service Notification from the Action dropdown menu.
- Select the Assign User Method from the Web Method dropdown menu. Methods will have their integration listed in the title.
- Click the Submit button to associate this method with this workflow.

As a final step, click the Update button in Settings, check the Enabled box, and click the green arrow to save. This workflow will now be ready for use.
Add Note to Ticket Workflow
This workflow will create a trigger for the Add Note to Ticket Method:
- For Type, select Alert and name the workflow. In this example, the workflow is named Autotask - Add Note
- Select Standard Alert for Alert Type.
Start Conditions
Once the workflow has been saved, you can add Start Conditions:
- Click the ADD button for Match All Conditions.
- Select AlertStatus from the condition name dropdown.
- Select is for the Operator.
- Select a value for status you would like to base this condition on. In this example, we have chosen Assigned.
- Click the green checkmark to save this condition.
Actions
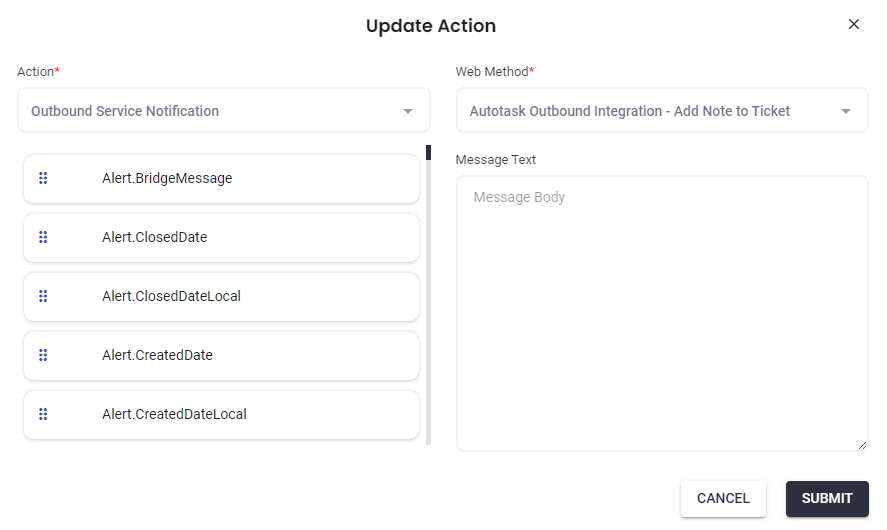
- Scroll down to the Actions section and click the +Add Action button on the right.
- Select Outbound Service Notification from the Action dropdown menu.
- Select the Add Note to Ticket Method from the Web Method dropdown menu. Methods will have their integration listed in the title.
- Click the Submit button to associate this method with this workflow.

As a final step, click the Update button in Settings, check the Enabled box, and click the green arrow to save. This workflow will now be ready for use.
Associating Workflows to an Escalation Policy
The next step for workflows is associating them with an Escalation Policy from the Automation tab.
We need to configure two Escalation Policies to handle the Create Ticket workflow separately from the rest.


Assigning Resource Roles in Autotask
ResourceID
The resource ID is an Autotask user identifier and can be found in your Autotask environment. In Autotask, go to Admin>Account Settings/Users>Resources/Users (HR)>Resources/Users. The resource ID will be found in the second column. .png)
RoleID
The role ID for a resource can be found with a GET request. A resource must have a default Service role configured in order to be assigned tickets. NOTE: API users cannot be assigned tickets.
To configure a Service Role:
- Click the menu icon next to the resource and click Edit.
.png)
- From the Resource Management page, open the Associations tab.
- In the Departments section, click the +New button.
- From the Department Name dropdown, select Service and select a service role from the Role Name dropdown.
- Check the box under Default Department and Role.
.png)
- Click Save and Close.
.png)
.png)
Now that this resource has been designated as a Service Role, they can now be assigned tickets.
Contact Support@AlertOps.com to complete your webhook configuration.
Was this article helpful?