Custom Email Integrations
- 19 Apr 2024
- 5 Minutes to read
- Print
- DarkLight
- PDF
Custom Email Integrations
- Updated on 19 Apr 2024
- 5 Minutes to read
- Print
- DarkLight
- PDF
Article summary
Did you find this summary helpful?
Thank you for your feedback!
The InboundIntegrations_GlobalAccess entitlement is necessary for creation, update, and deletion of inbound e-mail, API, and chat integration templates in the environment. The user roles that have access to this entitlement include Owner, App Admin, and Integrations Admin.
Email Integrations define the processing rules for creating AlertOps alerts from inbound emails.
Custom Email Integration 1– Always Create Alerts
For basic setup, you can configure a simple email integration to create a new alert every time an incoming email is received.
Basic Settings
- Enter a mailbox name (note: you can share email boxes between integrations).
- Enter a unique name for this integration.
- Select an Escalation Policy.
- Enter Recipient User(s) or Recipient Group(s) that will receive alerts and click Submit to save.
.png)
Advanced Settings
- Once saved, scroll down and expand Rules for Opening and Closing an Alert in Avanced Settings
- Check the box to enable Every Incoming Email Will Open an Alert
- Click the green checkmark to save changes.
(20).png)
Custom Email Integration 2 – Open, Close and Append Alerts
You can setup a more targeted email integration to indicate when an alert opened or closed, and also to append follow up alerts to reduce noise.
Basic Settings
- Enter a mailbox name (note: you can share email boxes between integrations).
- Enter a unique name for this integration.
- Select an Escalation Policy.
- Enter Recipient User(s) or Recipient Group(s) that will receive alerts and click submit.
(20).png)
Rules for Opening and Closing an Alert
- Once saved, scroll down and expand Rules for Opening and Closing an Alert in Advanced Settings.
- Check the box to Disable Every Incoming Email Will Open an Alert.
- Click the green checkmark to save changes.
(17).png)
Matching Fields and Alerts
In order to close and append alerts, the Source Name and Source Identifier are used to match alert signals to one another. You can extract the Source Name and Source Identifier from either the subject or the body of the email.
Example: Nagios Host Email Integration
This example will be based on Nagios email alerts.
We will map the incoming alerts based on the subject and body of the following two emails:
- To isolate the Source Name from this example email, we will extract the value for Service using BodyTextBetween, which will isolate the text between "Service:" and "Host:". An example can be seen in the image below.
- The Source Identifier will be the value for Host. Using BodyTextBetween, isolate the text between "Host:" and "Address:"
(12).png)
- Next, we will set the commands that control when an alert will be opened or closed. As we can see in the email, we will be using the subject to define the status of an alert. Using the example as shown in the image below, an alert will be opened whenever the subject contains PROBLEM.
- An alert will be closed whenever the subject contains RECOVERY.
- An alert will be updated when the subject contains UPDATE. Update Alert commands tell AlertOps to process updates as additional messages, which are appended to the initial alert, but do not produce additional alerts.
(8).png)
Alert Fields Mapping
Additional settings for mapping additional fields are available at the bottom of the Advanced Settings section.
- Long Text is the message users will receive with Mobile and Email notifications.
- Short Text is the message users will receive for Voice and SMS notifications
- Source URL allows you to send a URL from the alert source.
(5).png)
Filters To Match Incoming Emails
Filters are used to control whether an incoming alert signal meets certain requirements to create an alert. All filters must be true for an incoming alert signal to be processed.
- Subject Filters provide logical (AND, NOT) conditions for the email subject.
- Body Filters provide logical conditions for the email body.
- Senders/Recipients Filters provide logical conditions for the email senders/recipients.
- Priority Filters set logical conditions on email priority.
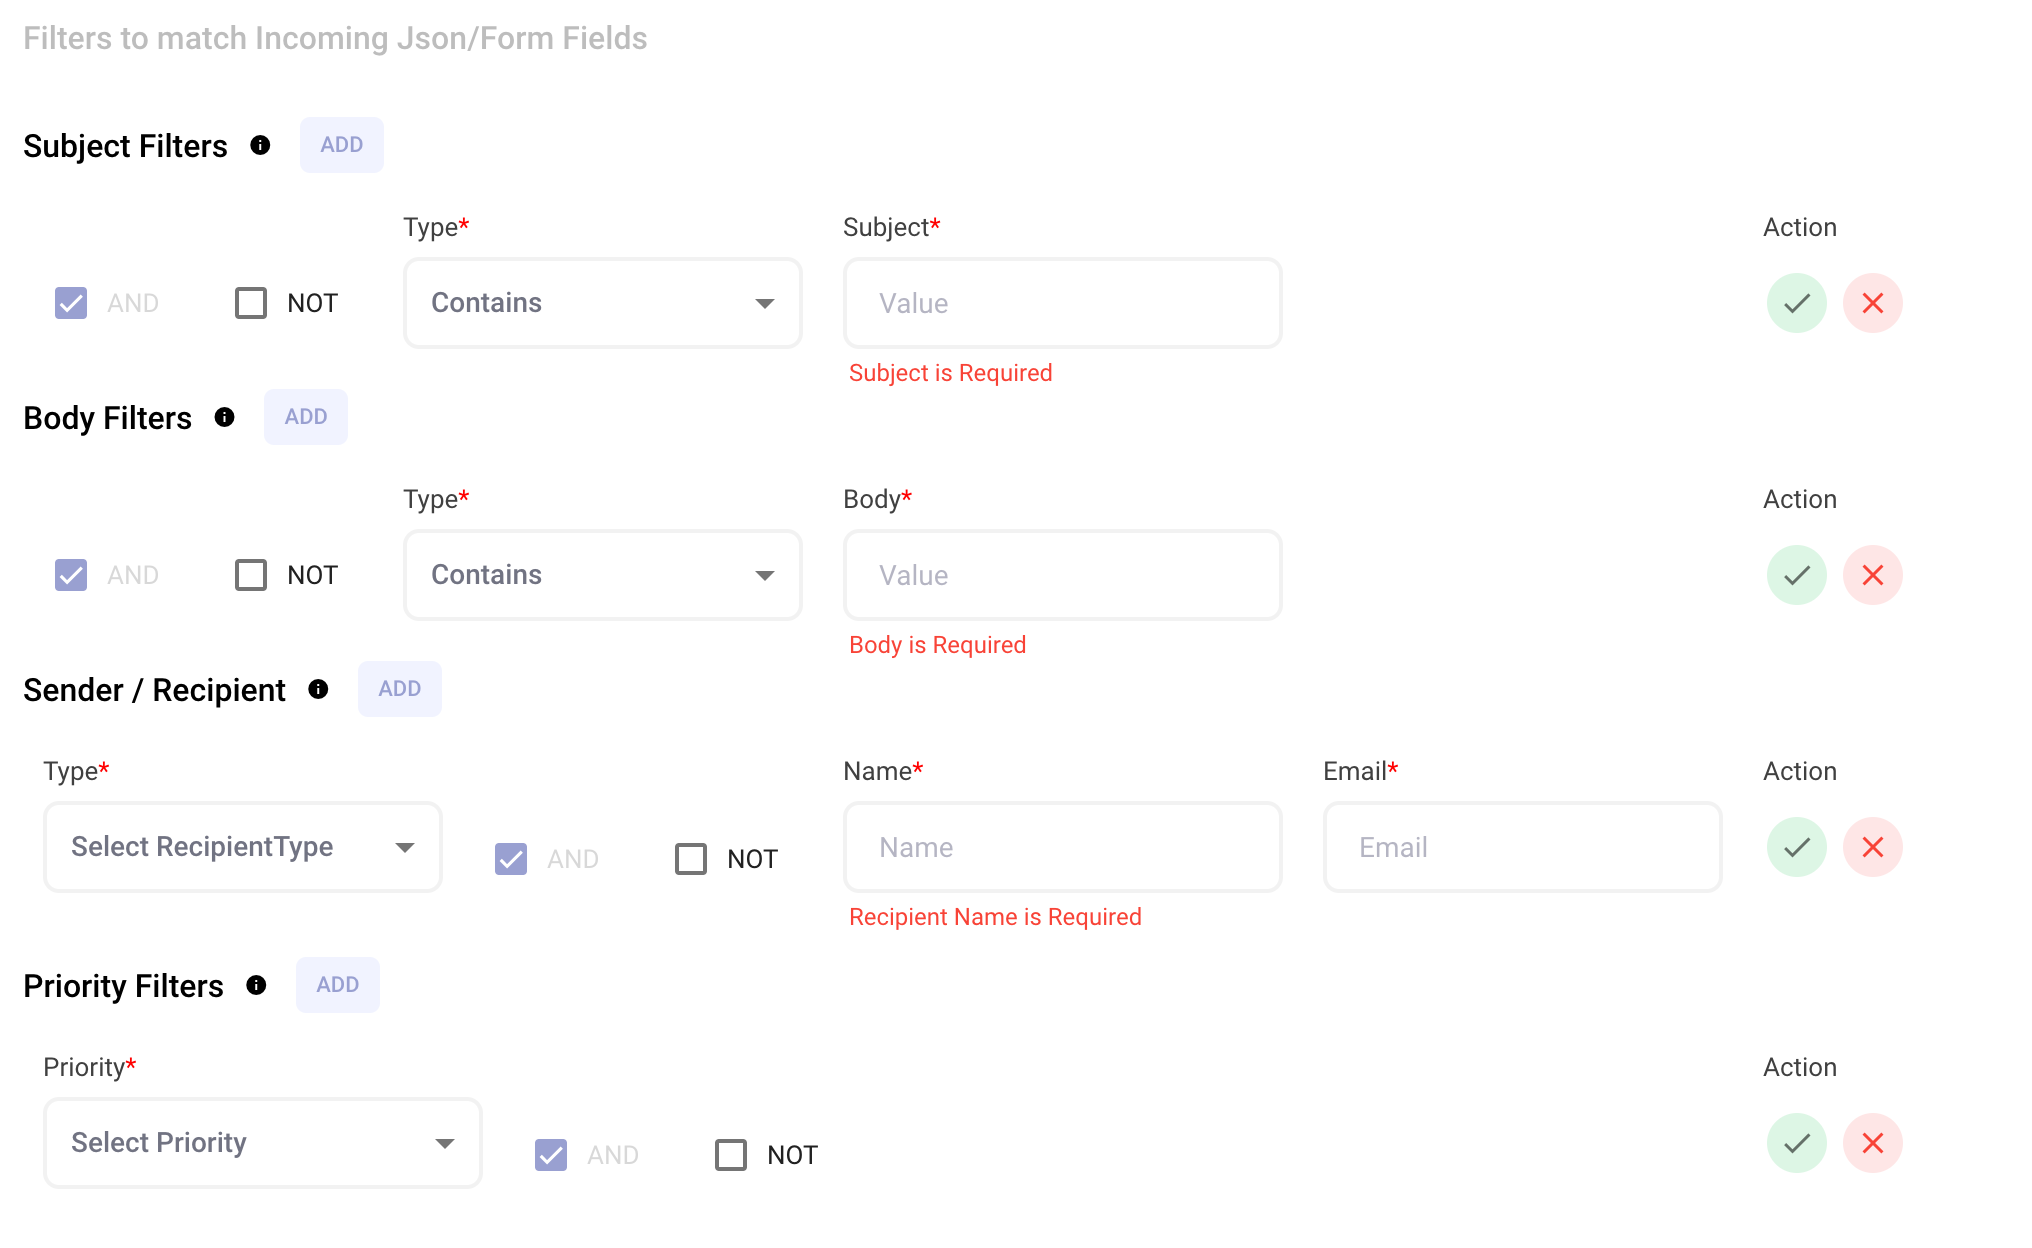
Value
The value field represents the associated value. Inputting a value here dictates the matching criterion, determining when the filter should trigger further actions based on the subject/body/sender/priority.
Type
A filter type determines how specific conditions, like pattern or exact matching, are applied to identify and act on data points. Various filter types provide different approaches to customize and refine the filtering process based on your needs as well as the incoming email characteristics. When setting a filter, users can choose the pattern-matching from the Type dropdown.
Filter Types for Subject Filters
- Contains specifies that the incoming email subject must have a complete word or sentence that exactly matches what is input here as the subject value. Unlike "Contains Any," this type does not allow for partial matches.
- MatchesRegex allows users to set a filter subject value using regular expressions for advanced pattern matching in a subject line.
- Is Any enables users to set multiple filter values, and the alert will be processed if any of these subject values exactly match the incoming email.
- Contains Any permits the filter subject value to be one word, part of a word, or a whole sentence. This type also supports multiple values to create an 'Or' condition.
Filter Types for Body Filters
- Contains specifies that the incoming email body must have a complete word or sentence that exactly matches the body value you set here. Unlike "Contains Any," this type does not allow partial matches.
- MatchesRegex allows users to set a filter value using regular expressions for advanced pattern matching from the body of the email.
- Contains Any permits the incoming email body to be one word, part of a word, or a whole sentence. This type also supports multiple values for comprehensive filtering.
Filter Types for Sender/Recipient Filters
Here you can specify if an incoming email will create an alert if it contains a particular email contact in either the sender, recipient, or cc of the email.
Filter Logic
Email Integration filters can have logic applied to Subject and Body Filters as explained in the following examples.
An important thing to note is the initial filter condition is marked as a mandatory ‘And’ and can only be updated if there is more than one condition.

Check all ‘And’ boxes if you want the filter to only evaluate if all conditions are met.
To create and ‘Or’ condition, uncheck all ‘And’ boxes.
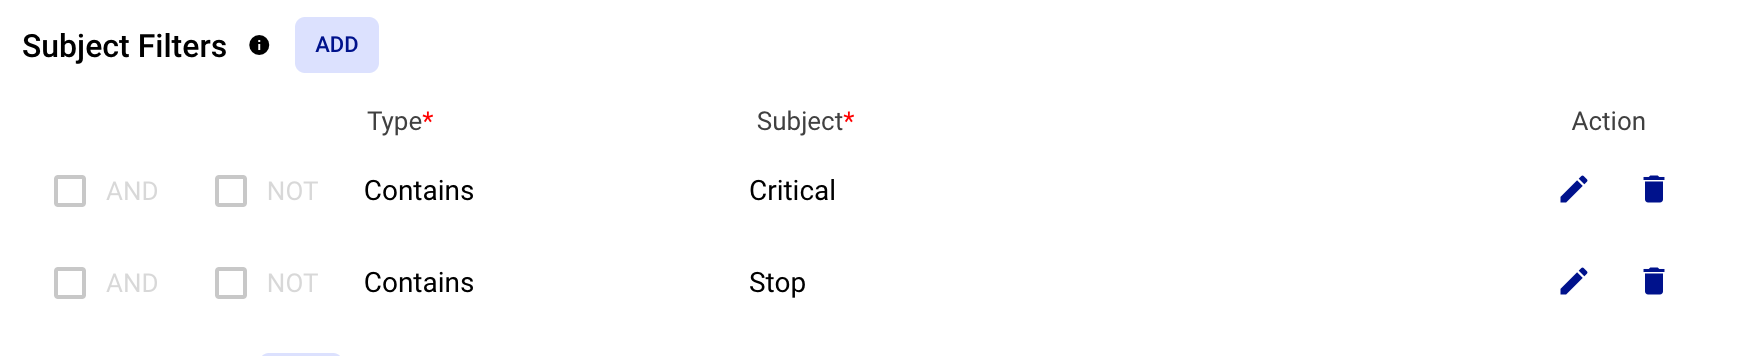
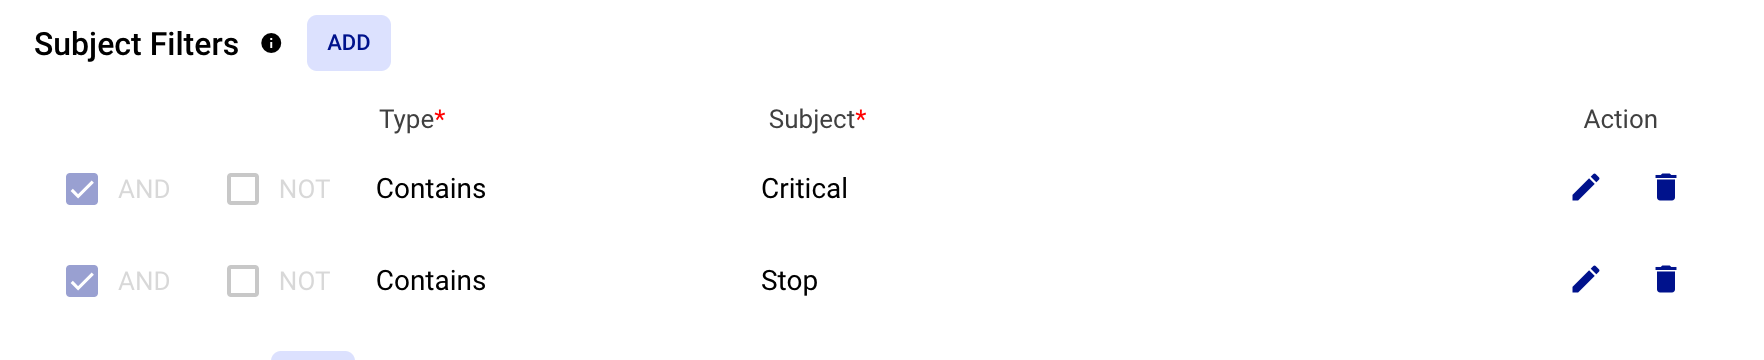
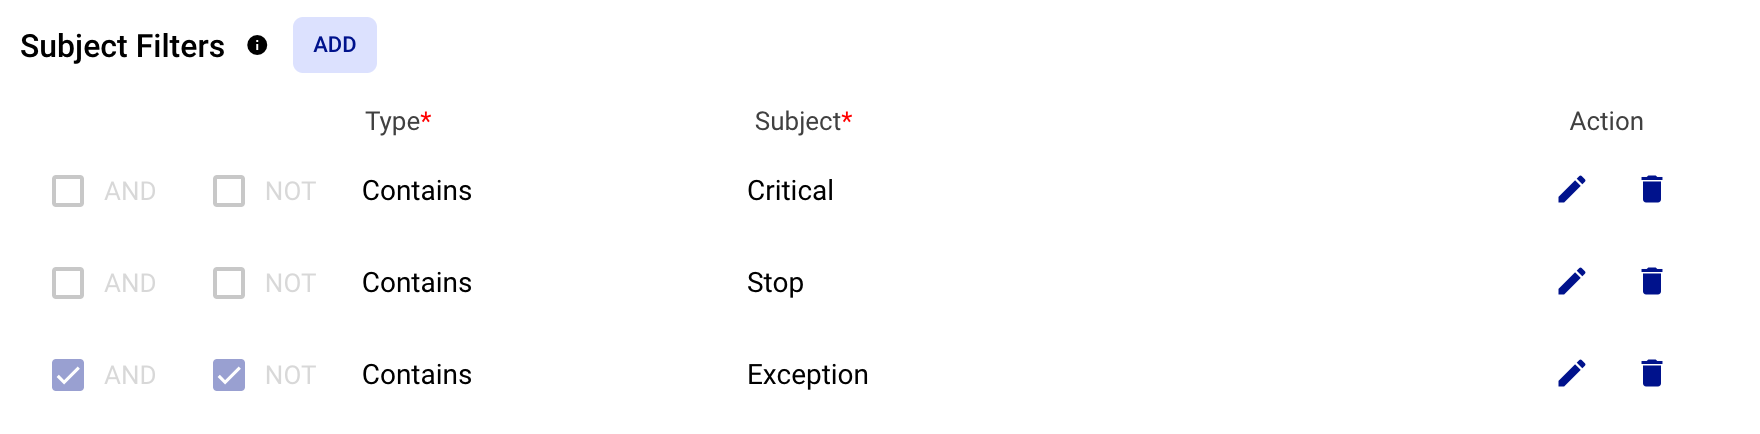
To create an ‘And Not’ condition, check the ‘And’ and ‘Not’ box. In the example below, this filter will evaluate if the subject contains 'Critical' or 'Stop' but not if it contains 'Exception'.
Alert Delaying/Grouping
In some cases, admins might want to configure an alert delay to reduce notification noise.
- Delay notifications for (n) alerts received within (n) minute(s) – After receiving an incoming alert signal, AlertOps will wait the specified number of minutes for the specified number of alerts before opening an alert.
- Delay notifications for (n) alerts received – After receiving an incoming alert signal, notifications will be delayed for a specified number of alerts received
- Delay notifications for (n) minute(s) – After receiving an incoming alert signal, alerts will be delayed for a specified number of minutes.
- Delay notifications until support hours begin – If an incoming alert is received outside of support hours, notifications will be delayed until the support hours resume.
(1).png)
Similar to an API Integration, AlertOps' E-Mail Integrations feature Dynamic Routing for overriding Escalation Policies based on the time an alert is generated. For teams with varying schedules, this may be useful to govern the day, start-time, and end-time an Escalation Rule should be used. In addition, AlertOps Dynamic Routing also features dynamically changing the recipient groups based on inbound data. For more information, check out our documentation on Dynamic Routing.
Was this article helpful?