Autotask Outbound 2025
- 31 Mar 2025
- 8 Minutes to read
- Print
- DarkLight
- PDF
Autotask Outbound 2025
- Updated on 31 Mar 2025
- 8 Minutes to read
- Print
- DarkLight
- PDF
Article summary
Did you find this summary helpful?
Thank you for your feedback!
Configuring Autotask Outbound API Integration
Step 1: Create API Permissions in Autotask
- Log into Autotask and navigate to your Autotask menu.
- Access Security Levels by going to Admin > Account Settings & Users > Security Levels.
- Create a New Security Level by Copying an Existing One:
- Locate the existing API User (system)(API-Only) security level and click the three-dot menu to select Copy.
- Configure the Security Level:
- General Settings:
- Name the security level descriptively, such as "API User - AlertOps Integration."
- Grant Full API Access:
- Scroll down to the Web Services API section.
- Click Full Permission to grant full API permissions for this security level.
- General Settings:
- Save the Security Level:
- Click Save and Close to finalize the security level configuration.
Step 2: Create API User in Autotask
- Log into Autotask:
- Navigate to Admin > Account Settings & Users > Resources/Users>Resources/Users
- Create an API User:
- Click the down arrow next to New and select New API User.
- Fill in the required general fields (e.g., Username, Email).
- Assign the previously created custom security level to this user.
- Generate and securely store the following credentials:
- Username: The API Username for this user.
- Secret: The unique secret key generated for the API user.
- Tracking Identifier: Assign a custom name for tracking this integration.
- Save this record, and ensure that you copy and store these credentials for use in the next steps.
Step 3: Set Up Autotask Outbound Integration in AlertOps
- Access Integrations:
- Go to Configuration > Integrations in AlertOps.
- Add a New API Integration:
- Scroll down to the Outbound Integration section.
- Click +ADD OUTBOUND under the Outbound Integrations section.
- Select Custom from the integration tiles.
- Create the Integration
- Set the integration name as "Autotask Outbound Integration."
- Select None for Web Security Type.
- Click Submit to save the integration.
Step 4: Prepare AlertOps Environment
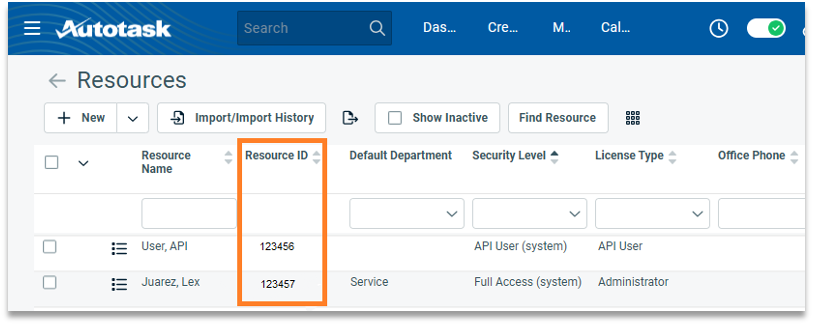
External ID
The AlertOps user must have their external ID saved with their Resource ID from Autotask to be assigned tickets. If you plan to assign users to Autotask tickets from AlertOps, you need to properly store Resource IDs.
To find your Resource ID, in your Autotask environment go to Admin>Account Settings/Users>Resources/Users (HR)>Resources/Users. The resource ID will be found in the second column.
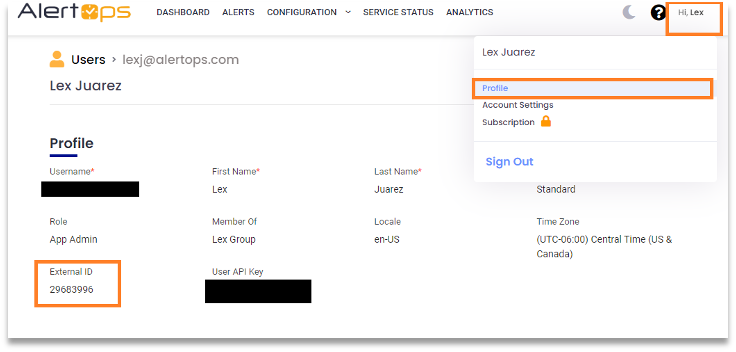
Input your Resource ID in your AlertOps Profile.
Custom Attributes
To complete the following methods, create custom fields for ResourceRoleID and TicketID.
- Navigate to Configuration>Administration
- From Alert Types, select Standard Alert
- Click +Add Alert Fields on the right.
- Name this Alert Field.
- Choose Data Type
- For Alert Field Group, input Autotask (this is for organizational purposes within an alert).
- Submit to save.

Note: If you copy-paste to create the methods found below, ensure that your custom fields exactly match the ones found in this image.
Get Zone:
To find your Autotask Zone, look at the number after "ww" when you log in to your Autotask account. For example, ww2.autotask.net belongs to Zone 2. This will be used in all your method URIs.

Autotask API User Credentials
To create the following methods, you will need to have your Autotask API user credentials:
- Username: The API Username.
- Secret: The unique secret key generated for the API user.
- Tracking Identifier: Assign a custom name for tracking this integration.
Step 5: Configure Methods in AlertOps
In this guide, the following methods are available:
- Create Ticket Method: Creates a new ticket in Autotask based on an alert in AlertOps.
- Get User’s Resource Role ID Method: Retrieves the role ID of a user in Autotask to assign tickets correctly. Mandatory for Assignment.
- Update Ticket Method: Updates an existing ticket in Autotask, such as changing its status or assigning it to a technician.
- Close Ticket Method: Closes a ticket in Autotask when an alert in AlertOps is resolved.
- Add Note Method: Adds a note to an existing ticket in Autotask from AlertOps.
Methods:
Once you have completed the above steps, you will be able to easily configure the following methods.
To create a Method:
- Navigate to Configuration>Integrations.
- Scroll down to Outbound Integrations.
- Select or create the outbound integration for Autotask.
- From the Methods section, click +Add Method.
Create Autotask Ticket Method
Configure a method to create a ticket in Autotask:
- Select a name for the method. In this example, we can name this method Create Ticket.
- Choose POST for the Request Method.
- The URI sample below contains the required fields.
- The Request Data sample below contains the required fields.
- The Response Data sample below contains the fields we need to map.
- Set 3 Headers as the final configuration for this method: Username, Secret, and ApiIntegrationCode with the values from Autotask API Username, API user secret, as well as the API Tracking Identifier respectively.
https://webservicesYOURZONE.autotask.net/ATServicesRest/v1.0/Tickets{"companyID":123,"priority":1,"queueID":29682833,"status":1,"title":"<<Alert.Topic>>","description":"<<Alert.Description>>"}{"itemId":"<<Attribute.TicketID>>"}Helpful Tips:
- In the request data above, we have mapped some dynamic AlertOps fields for you for title and description.
- companyID needs to be updated to a specific company within your Autotask environment. To find this identifier:
- Access the Autotask main menu and select CRM>Accounts.
- Select the company and find the account ID (companyID) at the top of the screen.
- Priority has been mapped to 4 or "High" in the sample. To find your custom Priority values, you will need to create a GET API call.
- Status has been mapped to 1 or "New" in the sample. To find your status values, you will need to create a GET API call.
- QueueID has been mapped to the value for "Triage" in the sample. To find a value for a particular queue, navigate to Admin>Features and Settings>Service Desk>Queues. Click Edit on the selected queue. Once opened, you will use the objectID at the end of the URL.
Get User's Resource Role ID Method
Configure this method to get the user’s associated resource role ID in Autotask. This is the numeric value associated with the user’s role and is required in order to assign a user from AlertOps.
Note: A resource (user) must have a default service desk role within their resource profile in Autotask to be assigned to tickets.
- Select a name for the method, e.g., Get User’s Autotask Resource Role ID.
- Choose GET for the Request Method.
- For the URI, the root will be your Autotask Zone.
- The Response Data sample below contains sample data with a mapped value for the resourceRoleID.
- Set 3 Headers as the final configuration for this method: Username, Secret, and ApiIntegrationCode with the values from Autotask API Username, API user secret, as well as the API Tracking Identifier respectively.
https://webservicesYOURZONE.autotask.net/ATServicesRest/v1.0/Resources/<<Alert.OwnerExternalID>>{"item":{"id":12345678,"accountingReferenceID":"ACCT-98765","dateFormat":"MM/dd/yyyy","defaultServiceDeskRoleID":"<<Attribute.ResourceRoleID>>","email":"fakeemail@example.com","email2":"secondaryemail@example.com","email3":"thirdemail@example.com","emailTypeCode":"PRIMARY","emailTypeCode2":"SECONDARY","emailTypeCode3":"TERTIARY","firstName":"Alex","gender":"M","greeting":1,"hireDate":"2022-05-15T00:00:00Z","homePhone":"555-123-4567","initials":"AJ","internalCost":8500.5,"isActive":false,"lastName":"Smith","licenseType":2,"locationID":87654321,"middleName":"Jordan","mobilePhone":"555-987-6543","numberFormat":"#,###.##","officeExtension":"1234","officePhone":"555-321-6789","payrollIdentifier":"PAY-00123","payrollType":2,"resourceType":"Contractor","suffix":"Jr.","surveyResourceRating":4.5,"timeFormat":"HH:mm:ss","title":"Senior Software Engineer","travelAvailabilityPct":50,"userName":"asmith","userType":5}}
Assign User &/Or Update Status Method
Next, we can configure a method to assign a ticket and update its status in Autotask.
Note: A resource (user) must have a default service desk role within their resource profile in Autotask to be assigned to tickets.
- Select a name for the method, e.g., Assign and Update Status.
- Choose PATCH for the Request Method.
- For the URI, the root will be your Autotask Zone.
- The Request Data sample below contains several required fields.
- Set 3 Headers as the final configuration for this method: Username, Secret, and ApiIntegrationCode with the values from Autotask API Username, API user secret, as well as the API Tracking Identifier respectively.
https://webservicesYOURZONE.autotask.net/ATServicesRest/v1.0/Tickets{"id":"<<Attribute.TicketID>>","assignedResourceID":"<<Alert.OwnerExternalID>>","assignedResourceRoleID":"<<Attribute.ResourceRoleID>>","status":8}Note: You can update the status value to whatever value you associate with assigned. In this case, a value of 8 corresponds with the "In Progress" status. To find your status values, you will need to create a GET API call.
- If you do not want to update status, you can leave status out of the request data entirely.
- If you do not want to assign a user, you can remove assignedResourceID and assignedResourceRoleID.
Close Ticket Method
Configure a method to close a ticket in Autotask:
- Select a name for the method, e.g., Get Ticket.
- Choose PATCH for the Request Method.
- For the URI, the root will be your Autotask Zone.
- The Request Data sample below contains the required fields.
- Set 3 Headers as the final configuration for this method: Username, Secret, and ApiIntegrationCode with the values from Autotask API Username, API user secret, as well as the API Tracking Identifier respectively.
https://webservicesYOURZONE.autotask.net/ATServicesRest/v1.0/Tickets{"id":<<Alert.SourceIdentifier>>,"status":5}Note: You can update the status value to whatever value you associate with closed. In this case, a value of 5 corresponds with the "Complete" status.
Optional - Add Note Method
Configure a method to add a note to a ticket in Autotask:
- Select a name for the method, e.g., Add Note to Ticket.
- Choose POST for the Request Method.
- For the URI, the root will be your Autotask Zone.
- The Request Data sample below contains several required fields. Map the fields according to your organization's requirements.
- Set Headers for Username, Secret, and ApiIntegrationCode with the values from Autotask API Username, API user secret, as well as the API Tracking Identifier respectively.
https://webservices2.autotask.net/ATServicesRest/v1.0/Tickets/<<Attribute.TicketID>>/Notes{"creatorResourceID":<<Alert.OwnerExternalID>>,"noteType":2,"publish":1,"description":"This ticket has been assigned to <<Alert.OwnerName>> via AlertOps.","ticketID":"<<Attribute.TicketID>>","title":"This ticket has been assigned to <<Alert.OwnerName>>"}Note: Values for noteType and publish can be found with a GET API call.
Step 6: Set Up Workflows to Trigger Methods
Workflow for Create Ticket Method
- Create a Workflow:
- Go to Configuration > Workflows in AlertOps.
- Click +ADD WORKFLOW.
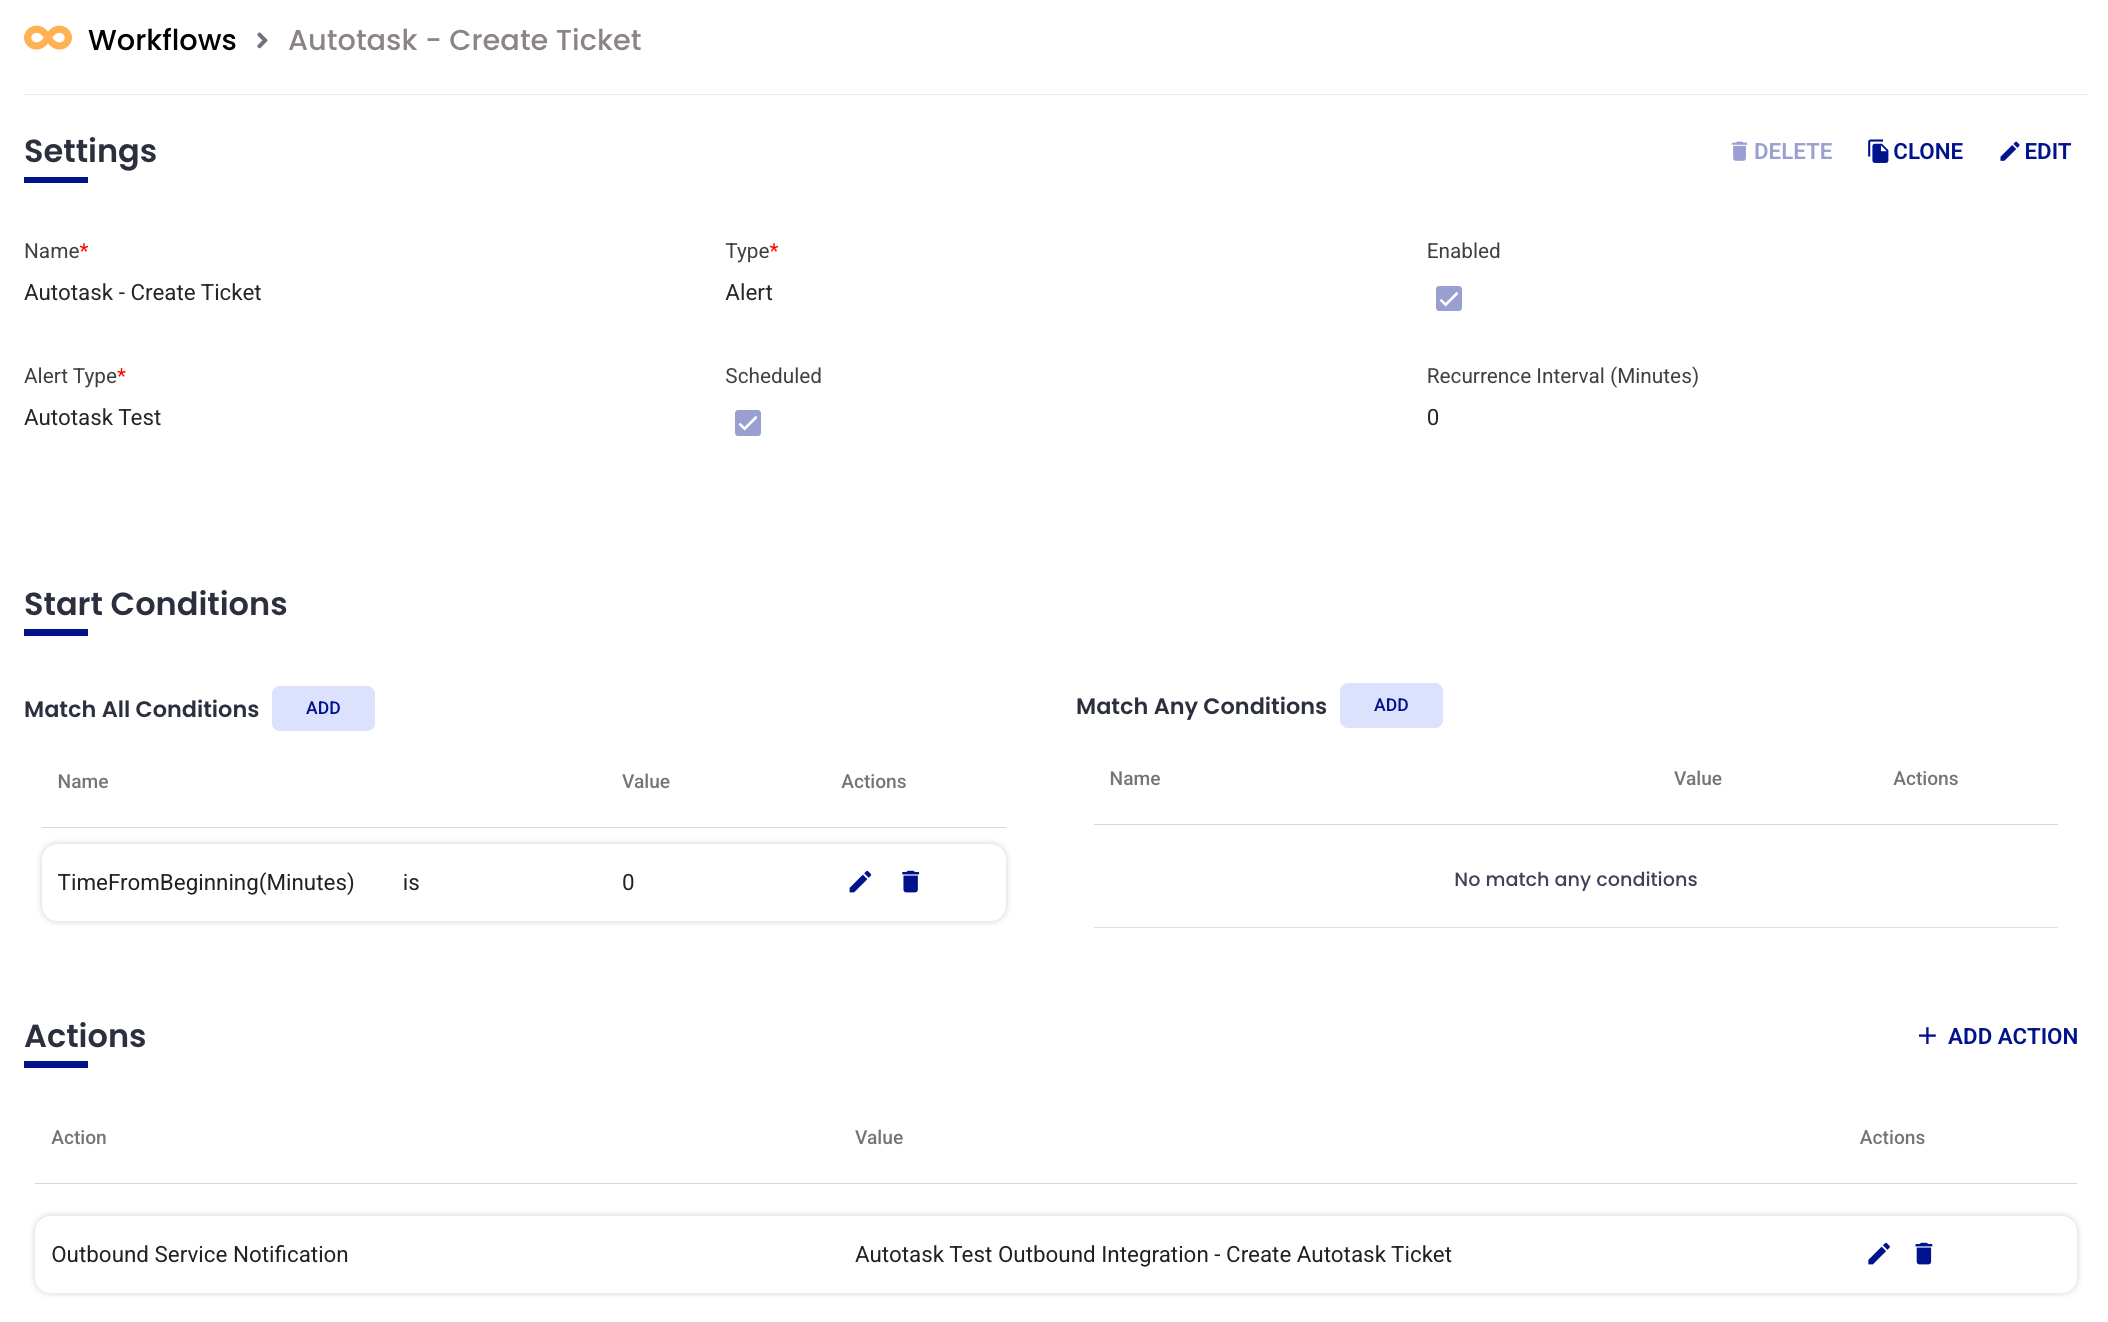
- Name the workflow: For example, "Autotask - Create Ticket".
- Select Alert Type: Standard Alert.
- Check the Scheduled box.
- Set Start Conditions:
- Click +Add Condition under the Match All Conditions section.
- Select Condition Name: TimeFromBeginning.
- Select Operator: is.
- Enter Value: 0.
- Click the green checkmark to save.
- Set Actions:
- Scroll to the Actions section and click +Add Action.
- Select Action Type: Outbound Service Notification.
- Select Web Method: Create Ticket.
- Click the green checkmark to save.
- Enable the Workflow:
- Click Settings and check the Enabled box.
- Click the green checkmark to save.
Workflow for Get User’s Resource Role ID Method
- Create a Workflow:
- Go to Configuration > Workflows in AlertOps.
- Click +ADD WORKFLOW.
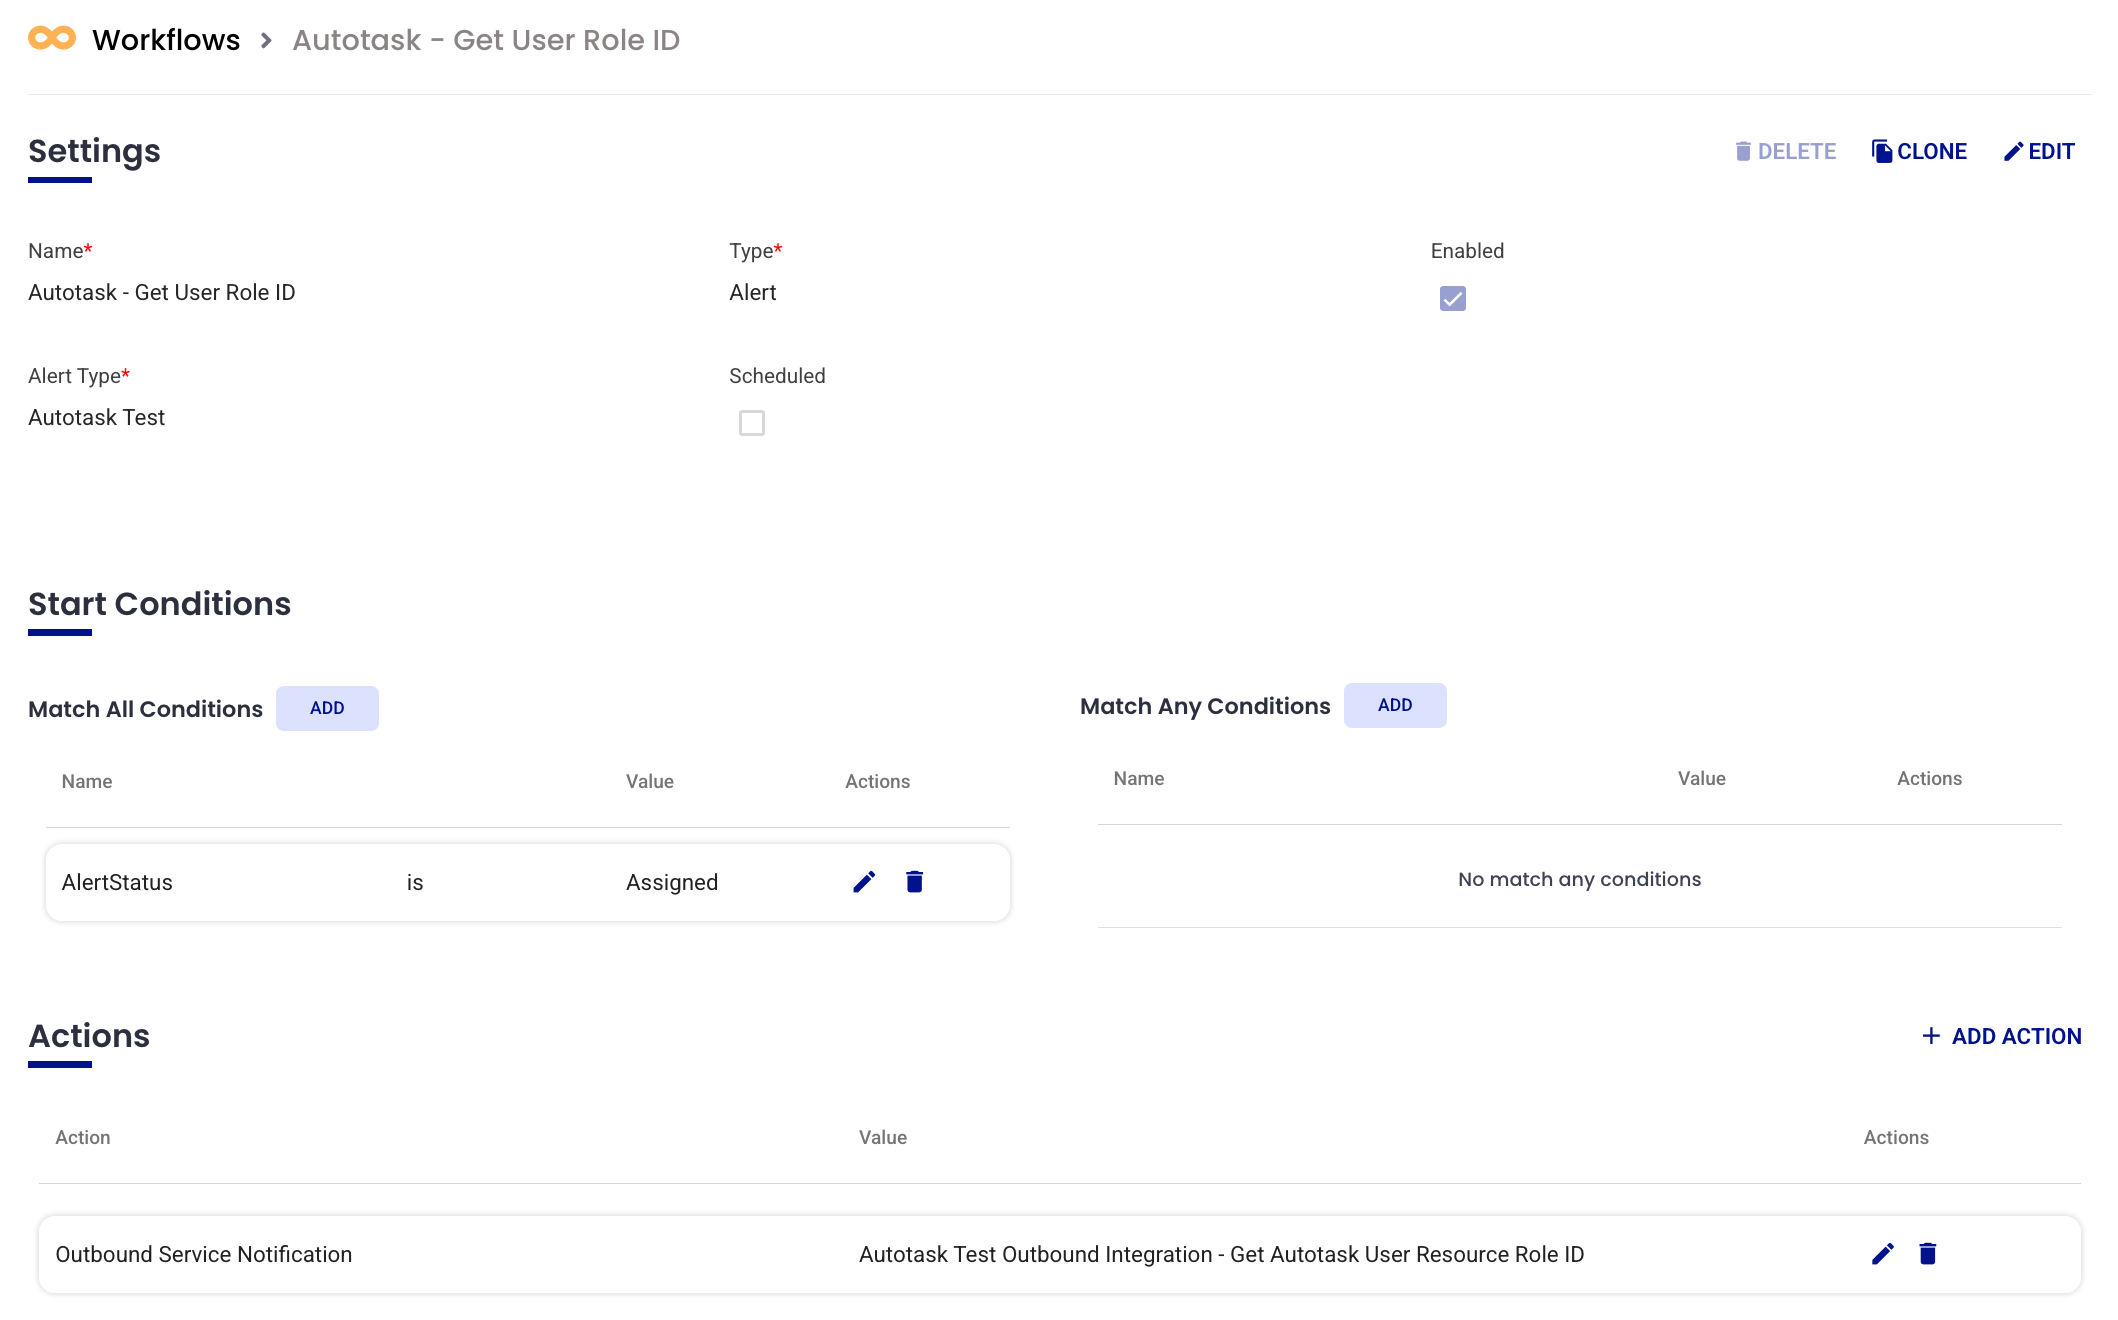
- Name the workflow: For example, "Autotask - Get User Role ID".
- Select Alert Type: Standard Alert.
- Set Start Conditions:
- Click +Add Condition under the Match All Conditions section.
- Select Condition Name: AlertStatus.
- Select Operator: is.
- Select ‘Assigned’ for the value and click the green checkmark to save this condition.
- Set Actions:
- Scroll to the Actions section and click +Add Action.
- Select Action Type: Outbound Service Notification.
- Select Web Method: Get User’s Resource Role ID.
- Click the green checkmark to save.
- Enable the Workflow:
- Click Settings and check the Enabled box.
- Click the green checkmark to save.
Workflow for Update/Assign Ticket Method

- Create a Workflow:
- Go to Configuration > Workflows in AlertOps.
- Click +ADD WORKFLOW.
- Name the workflow: For example, "Autotask - Update Ticket."
- Select Alert Type: Standard Alert.
- Set Start Conditions:
- Click +Add Condition under the Match All Conditions section.
- Select the custom field for ResourceRoleID for theCondition.
- Select Operator is not.
- Leave Value blank.
- Click the green checkmark to save.
- Set Actions:
- Scroll to the Actions section and click +Add Action.
- Select Action Type: Outbound Service Notification.
- Select Web Method: Update/Assign Ticket.
- Click the green checkmark to save.
- Enable the Workflow:
- Click Settings and check the Enabled box.
- Click the green checkmark to save.
Workflow for Close Ticket Method
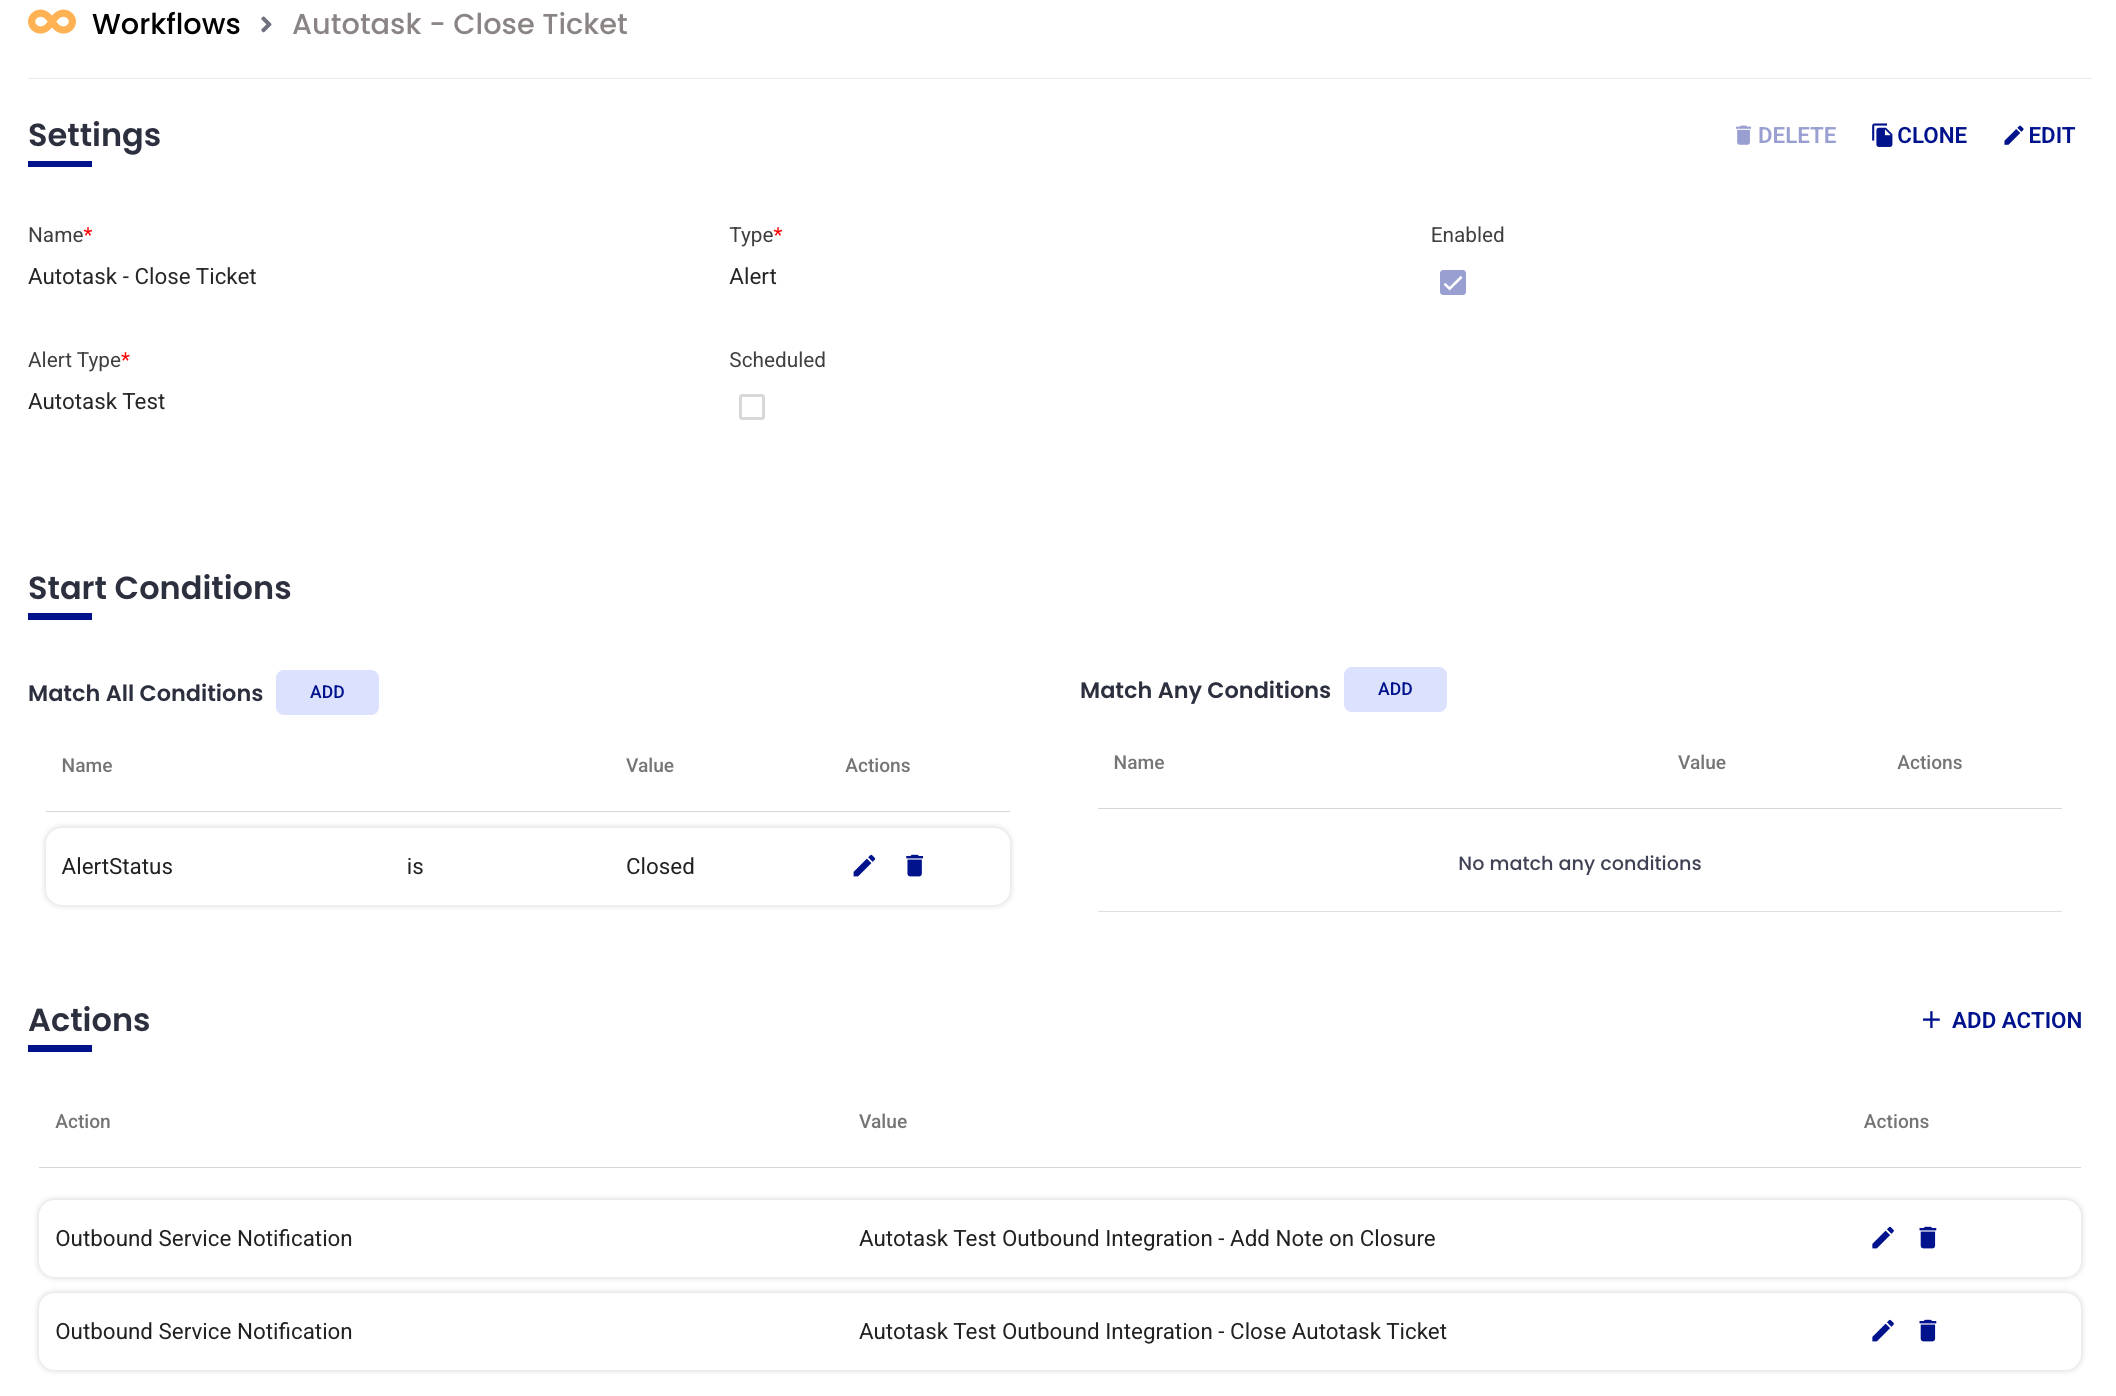
- Create a Workflow:
- Go to Configuration > Workflows in AlertOps.
- Click +ADD WORKFLOW.
- Name the workflow: For example, "Autotask - Close Ticket".
- Select Alert Type: Standard Alert.
- Set Start Conditions:
- Click +Add Condition under the Match All Conditions section.
- Select Condition Name: AlertStatus.
- Select Operator: is.
- Enter Value: Closed.
- Click the green checkmark to save.
- Set Actions:
- Scroll to the Actions section and click +Add Action.
- Select Action Type: Outbound Service Notification.
- Select Web Method: Close Ticket.
- Click the green checkmark to save.
- Enable the Workflow:
- Click Settings and check the Enabled box.
- Click the green checkmark to save.
Optional - Workflow for Add Note Method
You can include the Add Note method in either the Update/Assign Ticket workflow or the Close Ticket workflow as an additional action.
Set Actions:
- Scroll to the Actions section and click +Add Action.
- Select Action Type: Outbound Service Notification.
- Select Web Method: Add Note.
- Click the green checkmark to save.
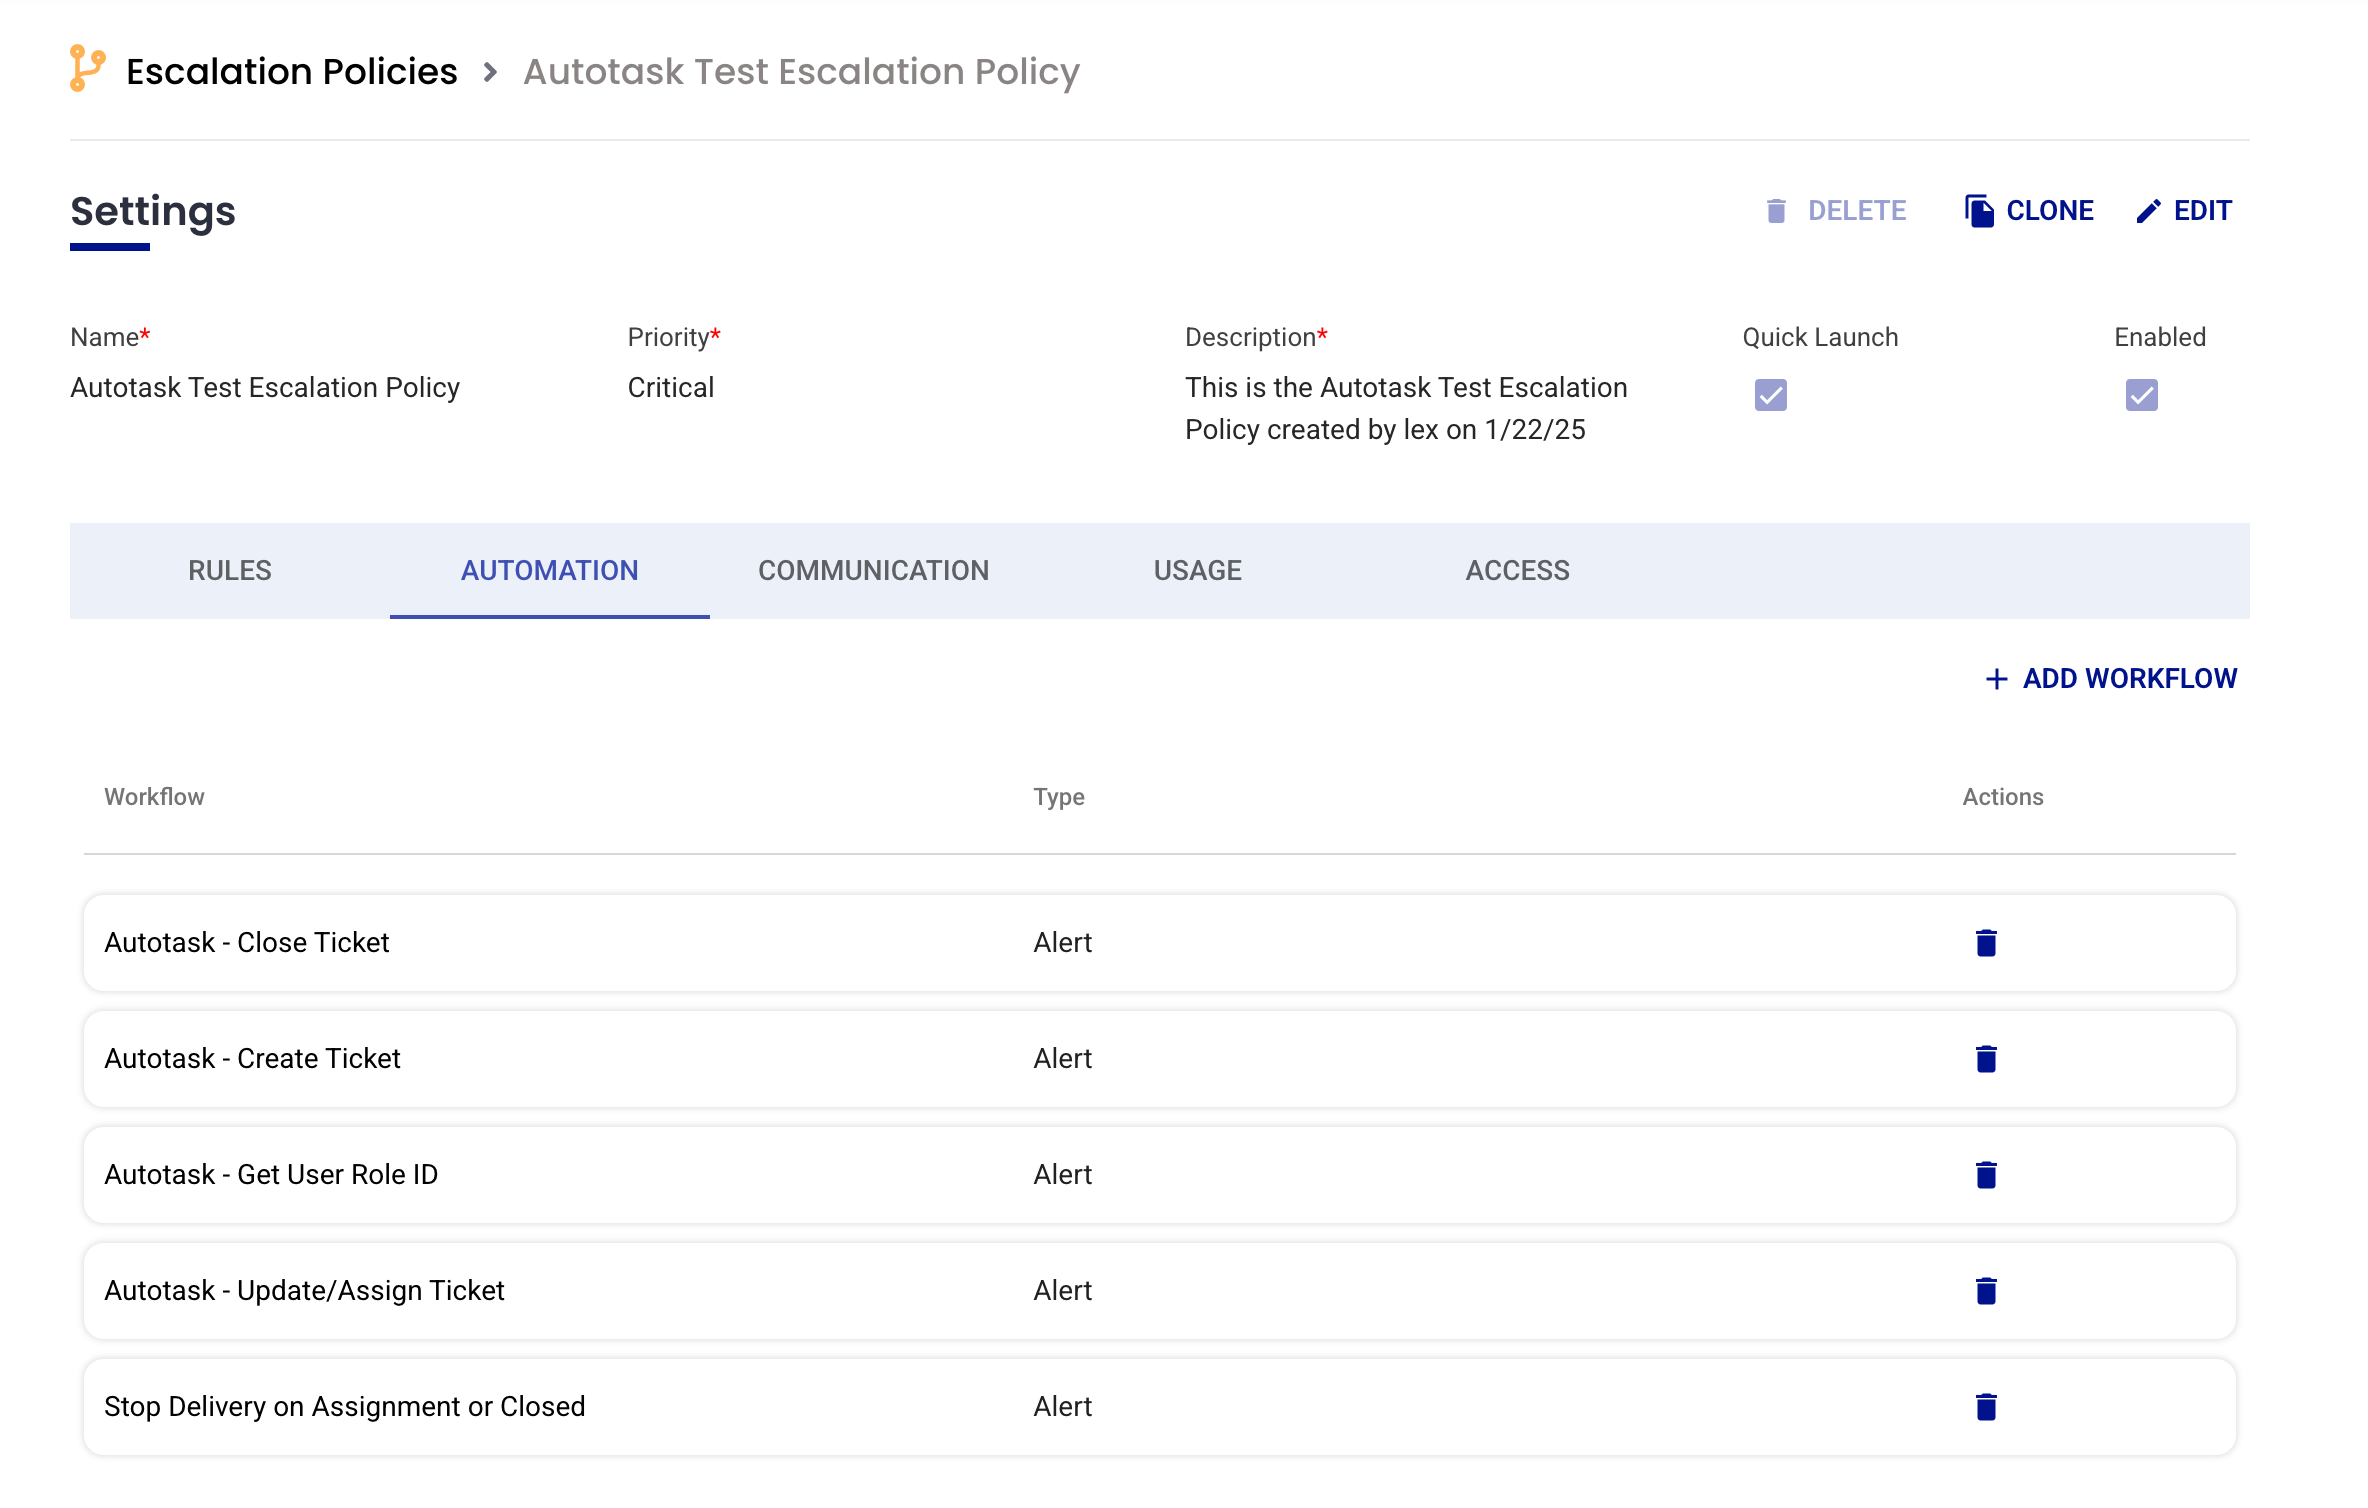
Escalation Policies
You can now add these workflows to your integration-associated escalation policy.
- Select the escalation policy.
- Click the Automation tab.
- Click +Add Workflow.
- Select the workflows we created above.
Was this article helpful?