Acknowledge Alerts using Webhooks
- 17 Jul 2023
- 2 Minutes to read
- Print
- DarkLight
- PDF
Acknowledge Alerts using Webhooks
- Updated on 17 Jul 2023
- 2 Minutes to read
- Print
- DarkLight
- PDF
Article summary
Did you find this summary helpful?
Thank you for your feedback!
The following entitlements are required to make changes to Workflows:
- Workflows_Update - Create, Update, and Delete Workflows
- Workflows_View - View existing Workflows
The user roles with access to these integration entitlements are Owner and App Admin.
A webhook is a lightweight API that powers one-way data sharing that is triggered by events. Workflows can trigger these events, and webhooks can be pre-configured to perform common actions automatically.
In this example we will create a Workflow that triggers a webhook to acknowledge an alert coming from an Inbound Integration.
To follow along with this example you must have configured an Inbound Integration with the external tool, a Recipient Group, and Escalation Rule. The Workflow we create will be called by the Escalation Rule when we are finished.
Configure a Workflow
- Select Workflows from Configurations on the main menu.
- Click the Add Workflow button in the top right corner of the screen.
- In the Add Workflow dialogue box choose Alert as the Type, enter a name for the Workflow, and Standard Alert for the Template and press Submit.
(12)(1).png)
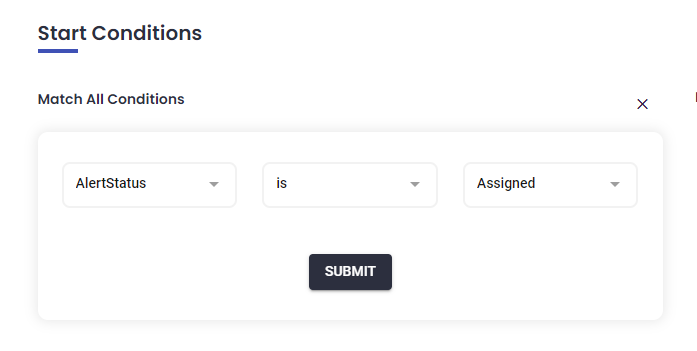
Add Start Conditions
- In the workflow detail page, click Add Start Condition in the match all section.
- In the Attribute field, choose AlertStatus, choose "is" for the operator, and finally set Assigned as the Value.
- Click the Submit button to save.
Add Actions
- Scroll down further on the Workflow page and press Add Action.
- Choose Send Webhook as the action. This will expand the dialogue box for more details.
- In the resulting dialog, choose your HTTP Method (based on the receiving application's requirements).
- Define the webhook in the URL field. Here we are using dynamic fields to populate sections of the webhook, so we must edit the URL to include dynamic field names. In the example below, the watch ID has been mapped to the <<MessageThread.SourceIdentifier>> field. For the Message field we have the option to drag and drop from the list of dynamic fields on the left. For the URL field, however, this edit must be typed in manually.
- Click Submit to save the action
(6)(1).png)
Add Workflow to Escalation Policy
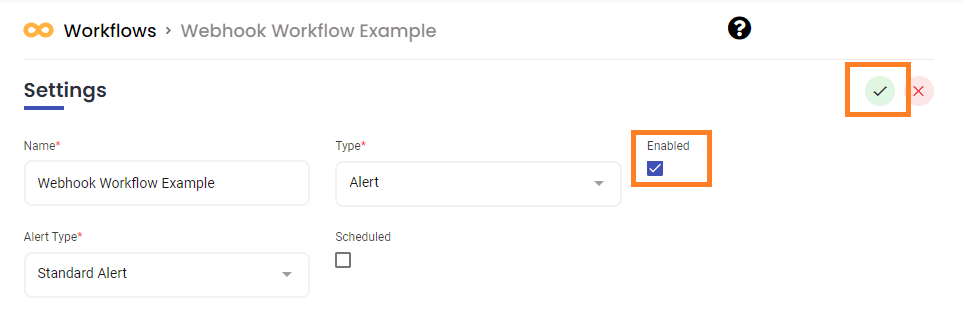
- Enable the Workflow by clicking the Update button in the top right corner of the Workflow page and then checking the Enabled box. Click the green checkmark to save. (Won't let me enable)
- Select Escalation Policies from Configuration the menu
- Click the Escalation Policy to add the Webhook and select the Automation tab.
- Click the Add Workflow button. In the resulting dialog, select your Workflow (it must be enabled to be visible here) and press the right arrow to move it to the Selected Workflows list.
- Click Submit to save this Workflow to the Escalation Policy.
(2).png)
Was this article helpful?